 |
Timeline Change Imminent! This article contains information that no longer applies to the current version of Star Trek Online. It is provided only for historical purposes. |
As of a patch on April 11, 2013, a re-vamped version of the Crystalline Entity mission was introduced into the game. This walkthrough reflects tactics for the previous version of the mission, and it may or may not be useful for the current version.
“Crystalline Catastrophe” is a fleet action that plagues many a player who are constantly hearing conflicting explanations on how exactly to defeat the Crystalline Entity. This guide will hopefully clear things up, and provide a few tips on what sort of strategy to form when approaching this behemoth cosmozoan boss character.
How to Create an Instance[ | ]
The Crystalline Entity can be selected as Fleet Action from the PvE queue. The Crystalline Entity can also be found hovering in the Alpha Centauri sector, usually near Memory Alpha. Contacting the Entity will bring up the PvE queue for fleet actions.
Know Your Enemy: Crystalline Entity[ | ]
For statistics on the Entity's armament, hull strength, damage resistance, and weapon immunity see: Crystalline Entity.
There are three stages of the Crystalline Entity of which players should be aware.
Stage I: High Health[ | ]
Between 66% and 100% Hit Points, whenever the Entity is damaged it will send out Crystalline Fragments. Fragments initially appear, or spawn, within a radius of about 4 km from the Entity. These regular-sized enemies will follow players that aggro them. When fragments get within 1 km of starships or any destructible object, they will explode. The damage they inflict upon detonation ignores shields, damaging your hull directly. In addition to launching fragments, at this stage the Entity fires an antiproton beam which does heavy damage but otherwise behaves as a normal weapon with no special shield penetration.
Stage II: Medium Health[ | ]
Between 33% and 66%, the Entity will stop firing its beam weapon, but will continue to send off Crystalline Fragments at a faster rate than before.
Stage III: Low Health[ | ]
Below 33%, in addition to normal-sized Crystalline Fragments the Entity now sends off Large Crystalline Fragments (hereinafter "Large Fragments"), launching dozens at a time. The Large Fragments have about twice the speed, hit points, and damage on detonation of regular Crystalline Fragments. If a Large Fragment is destroyed (either by detonation or by damage from weapons or abilities), it will spawn three Small Crystalline Fragments (hereinafter "Small Fragments"). The Small Fragments go back to the Entity, carrying the energy from their splintering to heal it for 1% of its health each — i.e., 3% total. It can take as long as 4 to 7 seconds for the three Small Fragments to appear after the destruction of a Large Fragment. At this stage the Entity can go from near death to full health in a very short time because of Large Fragments which are unwittingly detonated or destroyed to spawn masses of healing Small Fragments.
Graphics Issues[ | ]
If you totally ignore killing fragments, eventually the fragments get so numerous that the graphics engine is overwhelmed. At that point the CE disappears from view and targeting on it is lost, making it impossible to complete the mission unless the excessive fragments are destroyed.
Strategies[ | ]
Scatter Volley Method[ | ]
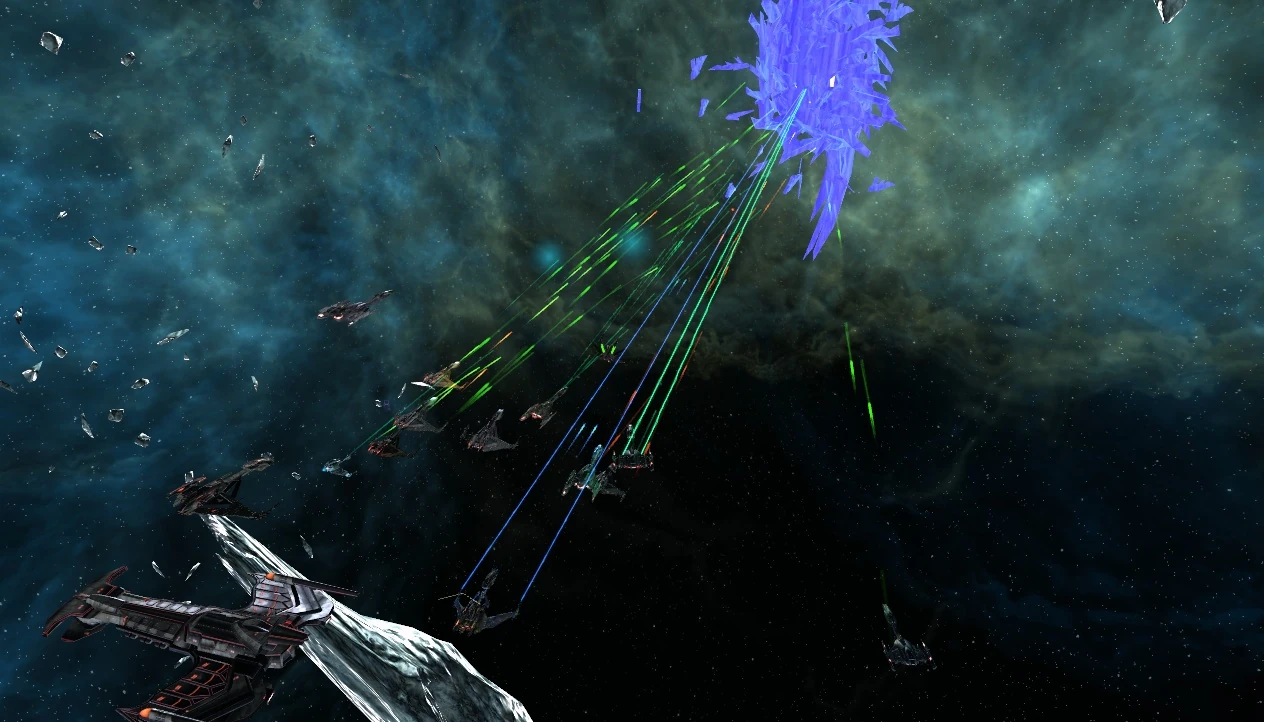
Klingon armada using scatter volley
All ships are in a tight formation aiming at the Crystalline Entity. Maintaining a distance of 7-9 km, they alternate using two versions of Cannon: Scatter Volley to deal damage to the Entity and kill all fragments that spawn from it. Apparently, by concentrating a tremendous amount of area-of-effect fire around the Entity, most Small Fragments will be destroyed before they heal the Entity. This method is really limited to attack groups made up solely of escorts or very heavy DPS ships. It is also best for all ships to come equipped with tractor beam repulsors to help keep fragments away from the group.
Semi-Kite Method[ | ]
This is the typical strategy attempted by PUG groups, because it is the simplest method to organize quickly and works well in the first two stages of the CE's health. Unfortunately, it is also the least successful method (of the three listed here) during the last stage of the CE's health because of the difficulty in avoiding Large Fragments while maintaining DPS on the CE.
In this method, about half of the players are in a Kite group (cruisers and science vessels) and the other half are in a DPS group (escorts). The kite group draws the aggro of fragments (using Beam Array: Fire at Will and AoE attacks), and flies above the Entity, with weapons power set to 40 and engines power at 90 (Extra power may be safely put to Auxiliary, as Shields are no protection in this fight). The DPS group positions below the CE at a distance of 7-9 km and concentrates their fire on ONLY attacking the boss.
When using this method, it is critical that destructible objects, and weapons and abilities that cause area of effect (AoE)/multiple target damage, be avoided once the Entity drops below 33% health and enters Stage III. These objects, weapons, and abilities will kill many Large Fragments, thus spawning masses of Small Fragments that will then quickly heal the CE (it can take 4-7 seconds for the Small Fragments to spawn, so you may not realize what you have done). It is advised to stop all AoE damage at 40%, as it takes some time for many active effects to expire. It is advised simply not to equip any destructible objects on your ship for this mission, because too often the objects are accidentally used during Stage III.
DO NOT USE these abilities once CE is in Stage III:
- Mines
- Hargh'peng, Tricobalt, Transphasic Cluster, or High Yield Plasma torpedoes
- Torpedo: Spread / Cannon: Scatter Volley / Beam Array: Fire at Will
- Fighters
- Fleet Support or Photonic Fleet ships
- Gravity Wells
- Warp Plasma / Theta Radiation
- Boarding Parties
Tractor Beam Repulsor Method[ | ]
Five science ships, equipped with 2 or 3 Tractor Beam Repulsors each, relay firing of tractor beam repulsors to protect all other ships which concentrate fire solely on the CE. In this method all ships stay together in tight formation and attempt to maintain a position 7-9km from the CE, in to order to benefit from the protection from fragments afforded by the repulsing science ships. A big advantage to this method over the Scatter Volley Method is that it does not require virtually all participants to be flying escorts. This method is also much easier to organize and more likely to succeed than the Semi-Kite Method during Stage III of the CE's health. This was the method used in the record breaking mission run of 2 minutes and 28 seconds.
As with the Semi-Kite Method, players should deploy no destructible objects and stop all area of effect ("AOE") damage, other than from repulsors, by the time the large fragments appear at 33% of the Entity's hit points.
Effective Ship Setups[ | ]
Weapons[ | ]
Damage type: Disruptor (alternatives: Antiproton, Plasma)
- Fore: Dual Heavy Cannons, Torpedo Launcher (alternative: Beam Arrays)
- Aft: Turrets
Items and Abilities[ | ]
The primary purpose is to do as much damage as possible:
Bridge Officer Abilities[ | ]
Engineering:
 Emergency Power to Weapons
Science:
 Photonic Officer
 Tractor Beam Repulsors
- Gravity Well (only in Stage I and II)
Tactical:
- Attack Pattern Beta
- Attack Pattern Omega
- Beam Array: Fire at Will (only in Stage I and II)
- Beam Array: Overload
- Cannon: Rapid Fire
- Cannon: Scatter Volley (only in Stage I and II, unless using Scatter Volley Method, i.e., 20 escorts)
- Tactical Team
- Torpedo: High Yield
- Torpedo: Spread (only in Stage I and II)
Consoles[ | ]
- [Console - Engineering - Plasma Distribution Manifold]
- [Console - Engineering - EPS Flow Regulator]
- [Console - Tactical - Directed Energy Distribution Manifold]
- [Console - Tactical - Prefire Chamber]
- [Console - Tactical - Warhead Yield Chamber]
- [Console - Universal - Assimilated Module]
Other[ | ]
- [Assimilated Subtranswarp Engines]
- [Assimilated Graviton Deflector Array]
- [Assimilated Regenerative Shield Array]
- [Aegis Graviton Deflector Array]
- [Aegis Hyper-Impulse Engines]
- [Aegis Covariant Shield Array]
Sample Builds (Scatter Volley Method)[ | ]
Guramba Siege Destroyer[ | ]
Fore Weapons: Disruptor Dual Heavy Cannons (x3), Quantum Torpedo Launcher
Aft Weapons: Disruptor Turret (x3)
![]() Tactical: Tactical Team I, Attack Pattern Beta I, Cannon: Scatter Volley II
Tactical: Tactical Team I, Attack Pattern Beta I, Cannon: Scatter Volley II
![]() Tactical: Torpedo: High Yield I, Torpedo: High Yield II, Cannon: Scatter Volley II, Attack Pattern Beta III
Tactical: Torpedo: High Yield I, Torpedo: High Yield II, Cannon: Scatter Volley II, Attack Pattern Beta III
![]() Engineering: Emergency Power to Weapons I
Engineering: Emergency Power to Weapons I
![]() Engineering: Engineering Team I, Auxiliary to Structural I
Engineering: Engineering Team I, Auxiliary to Structural I
![]() Science: Hazard Emitters I, Tractor Beam Repulsors I
Science: Hazard Emitters I, Tractor Beam Repulsors I
Eng Consoles: Plasma Distribution Manifold, Neutronium Alloy
Sci Consoles: Assimilated Module, Induction Stabilizer
Tac Consoles: Disruptor Induction Coil (x4)
Pach Raptor[ | ]
Fore Weapons: Disruptor Dual Heavy Cannons (x2), Dual Disruptor Beam Bank, Photon Torpedo Launcher
Aft Weapons: Disruptor Turret (x3)
![]() Tactical: Torpedo: High Yield I, Cannon: Scatter Volley I, Cannon: Scatter Volley II
Tactical: Torpedo: High Yield I, Cannon: Scatter Volley I, Cannon: Scatter Volley II
![]() Tactical: Tactical Team I
Tactical: Tactical Team I
![]() Tactical: Beam Array: Overload I, Torpedo: High Yield II, Beam Array: Overload III, Attack Pattern Omega III
Tactical: Beam Array: Overload I, Torpedo: High Yield II, Beam Array: Overload III, Attack Pattern Omega III
![]() Engineering: Engineering Team I, Emergency Power to Weapons II
Engineering: Engineering Team I, Emergency Power to Weapons II
![]() Science: Hazard Emitters I, Photonic Officer I
Science: Hazard Emitters I, Photonic Officer I
Eng Consoles: EPS Flow Regulator, Plasma Distribution Manifold (x2)
Sci Consoles: Assimilated Module, Biofunction Monitor
Tac Consoles: Disruptor Induction Coil (x4)
Common Misconceptions[ | ]
Healing[ | ]
The Crystalline Entity can only heal in two ways:
- Innate healing of 3% of its total hit points every 40 seconds, regardless of anything else.
- Small Fragments that return to it give the CE 1% of its total hit points. These only form when Large Fragments are destroyed by exploding on a destructible object, weapons fire, or damage causing abilities (e.g., Gravity Well ). At one time it was widely propounded that destroying Large Fragments with weapons fire spawned only temporary Small Fragments that were graphics anomalies and did not heal the Entity. However, this does not appear to be true currently, as can be observed by using Gravity Wells to corral and destroy all Large Fragments which do then spawn Small Fragments that clearly heal the Entity.
The regular Crystalline Fragments will not heal the Entity, only deal heavy damage to your ship.
Destructible Objects[ | ]
Destructible objects are anything besides your ship that can be destroyed by a fragment. This includes: mines, high yield plasma torpedoes, tricobalt devices/torpedoes, transphasic cluster torpedoes, boarding parties, Photonic Fleets, Fleet Support ships, and all other types of support pets (e.g., Stalker Fighters, Scorpion fighters, Tal'Kyr Support Craft, multi-vector ship sections, saucer sections, etc.). These are not useful when the CE is below 33% health because they are targets for Large Fragments which then spawn Small Fragments that heal the CE. Boarding parties are particularly useless, because the CE and fragments have no subsystems to disable. Although these weapons and abilities can be used at Stage I and II without healing the CE, it is better to equip with weapons and abilities that will protect you from fragments and do consistent damage through Stage III. Just one ship dropping mines, for example, can make it impossible to succeed at this mission. All of the most successful strategies for taking on the CE (including all three strategies listed above) ban the use of these weapons and devices by participants.
Torpedoes vs. Energy Weapons[ | ]
Kinetic damage DOES NOT heal the CE. Energy weapons have no innate advantage over torpedoes in this mission. It is a fallacy that killing Large Fragments with energy weapons will not spawn Small Fragments; said fallacy probably originated from the failure to realize that it can take 4-7 seconds for Small Fragments to spawn.
Scramble Sensors[ | ]
The Scramble Sensors ability at one point would stop all fragments from moving for several seconds and several science vessels with this would prevent the CE from being able to attack anyone. This has not been the case since Season 2.
Repel and Knockback[ | ]
An update in Season 4 made it so that the Crystalline Entity could not be knocked back or repelled, though this can still be used on fragments.
Final Notes[ | ]
This fleet action pretty much requires the cooperation of most, if not all, of the players in the instance. It is a battle designed to be best won with some amount of planning and coordination. Tactics that work in the first two stages of the mission will cause the mission to fail in Stage III. Whereas most fleet actions are simply a group of players against an immense number of enemies, the Crystalline Entity is quite different. It's a complicated enemy with a very particular methodology and pattern. As such, players must truly work as a team in order to defeat this opponent.
Victory[ | ]
Coming in first place grants the player a random and level-appropriate Very Rare item, the accolade Shattered, and a massive fleet action floor trophy:

Scores resulting in second and third place receive a Rare item, and all other players receive an Uncommon.
Players can alternate getting the first place reward by having the chosen player to deal damage before the rest of the players attack. Using buffs and heals on that player is strongly advised.