PiralDorrm (talk | contribs) |
m (Damixon moved page Specialization: Pilot to Pilot (specialization)) |
||
| (13 intermediate revisions by 3 users not shown) | |||
| Line 30: | Line 30: | ||
! style="text-align: left;"| Details |
! style="text-align: left;"| Details |
||
|- |
|- |
||
| − | | style="text-align: center;" | [[File:spec_pilot_t1_maneuvering_thrusters_icon.png]] |
+ | | style="text-align: center;" | [[File:spec_pilot_t1_maneuvering_thrusters_icon.png|link=]] |
| style="text-align: center;" width=25%| Maneuvering Thrusters I |
| style="text-align: center;" width=25%| Maneuvering Thrusters I |
||
| style="text-align: left;"| {{color|cyan|Space Skill}} |
| style="text-align: left;"| {{color|cyan|Space Skill}} |
||
| Line 37: | Line 37: | ||
*+5 Turn Rate while Stopped |
*+5 Turn Rate while Stopped |
||
|- |
|- |
||
| − | | style="text-align: center;" | [[File:spec_pilot_t1_maneuvering_thrusters2_icon.png]] |
+ | | style="text-align: center;" | [[File:spec_pilot_t1_maneuvering_thrusters2_icon.png|link=]] |
| style="text-align: center;" width=25%| Maneuvering Thrusters II |
| style="text-align: center;" width=25%| Maneuvering Thrusters II |
||
| style="text-align: left;"| {{color|cyan|Space Skill}} |
| style="text-align: left;"| {{color|cyan|Space Skill}} |
||
| Line 44: | Line 44: | ||
*+10 Turn Rate while Stopped |
*+10 Turn Rate while Stopped |
||
|- |
|- |
||
| − | | style="text-align: center;" | [[File:spec_pilot_t1_attack_pattern_expertise_icon.png]] |
+ | | style="text-align: center;" | [[File:spec_pilot_t1_attack_pattern_expertise_icon.png|link=]] |
| style="text-align: center;" width=25%| Attack Pattern Expertise I |
| style="text-align: center;" width=25%| Attack Pattern Expertise I |
||
| style="text-align: left;"| {{color|cyan|Space Skill}} |
| style="text-align: left;"| {{color|cyan|Space Skill}} |
||
| Line 50: | Line 50: | ||
*When activating Attack Patterns: __ Temporary Hit Points for 15 sec |
*When activating Attack Patterns: __ Temporary Hit Points for 15 sec |
||
|- |
|- |
||
| − | | style="text-align: center;" | [[File:spec_pilot_t1_attack_pattern_expertise2_icon.png]] |
+ | | style="text-align: center;" | [[File:spec_pilot_t1_attack_pattern_expertise2_icon.png|link=]] |
| style="text-align: center;" width=25%| Attack Pattern Expertise II |
| style="text-align: center;" width=25%| Attack Pattern Expertise II |
||
| style="text-align: left;"| {{color|cyan|Space Skill}} |
| style="text-align: left;"| {{color|cyan|Space Skill}} |
||
| Line 56: | Line 56: | ||
*When activating Attack Patterns: __ Temporary Hit Points for 15 sec |
*When activating Attack Patterns: __ Temporary Hit Points for 15 sec |
||
|- |
|- |
||
| − | | style="text-align: center;" | [[File:spec_pilot_t1_back_her_off!_icon.png]] |
+ | | style="text-align: center;" | [[File:spec_pilot_t1_back_her_off!_icon.png|link=]] |
| style="text-align: center;" width=25%| Back Her Off! |
| style="text-align: center;" width=25%| Back Her Off! |
||
| style="text-align: left;"| {{color|cyan|Space Skill}} |
| style="text-align: left;"| {{color|cyan|Space Skill}} |
||
| Line 63: | Line 63: | ||
*+20% Defense while in Reverse |
*+20% Defense while in Reverse |
||
|- |
|- |
||
| − | | style="text-align: center;" | [[File:spec_pilot_t1_eat_my_dust_icon.png]] |
+ | | style="text-align: center;" | [[File:spec_pilot_t1_eat_my_dust_icon.png|link=]] |
| style="text-align: center;" width=25%| Eat My Dust I |
| style="text-align: center;" width=25%| Eat My Dust I |
||
| style="text-align: left;"| {{color|cyan|Space Skill}} |
| style="text-align: left;"| {{color|cyan|Space Skill}} |
||
| Line 69: | Line 69: | ||
*When damaged on your rear arc, gain +2% Defense for 20 sec (stacks 5 times, triggers max once per 2 seconds) |
*When damaged on your rear arc, gain +2% Defense for 20 sec (stacks 5 times, triggers max once per 2 seconds) |
||
|- |
|- |
||
| − | | style="text-align: center;" | [[File:spec_pilot_t1_eat_my_dust2_icon.png]] |
+ | | style="text-align: center;" | [[File:spec_pilot_t1_eat_my_dust2_icon.png|link=]] |
| style="text-align: center;" width=25%| Eat My Dust II |
| style="text-align: center;" width=25%| Eat My Dust II |
||
| style="text-align: left;"| {{color|cyan|Space Skill}} |
| style="text-align: left;"| {{color|cyan|Space Skill}} |
||
| Line 75: | Line 75: | ||
*When damaged on your rear arc, gain +4% Defense for 20 sec (stacks 5 times, triggers max once per 2 seconds) |
*When damaged on your rear arc, gain +4% Defense for 20 sec (stacks 5 times, triggers max once per 2 seconds) |
||
|- |
|- |
||
| − | | style="text-align: center;" | [[File:spec_pilot_t1_desperate_flight_icon.png]] |
+ | | style="text-align: center;" | [[File:spec_pilot_t1_desperate_flight_icon.png|link=]] |
| style="text-align: center;" width=25%| Desperate Flight I |
| style="text-align: center;" width=25%| Desperate Flight I |
||
| style="text-align: left;"| {{color|cyan|Space Skill}} |
| style="text-align: left;"| {{color|cyan|Space Skill}} |
||
| Line 83: | Line 83: | ||
**Up to 10% max Bonus at 20% Hull |
**Up to 10% max Bonus at 20% Hull |
||
|- |
|- |
||
| − | | style="text-align: center;" | [[File:spec_pilot_t1_desperate_flight2_icon.png]] |
+ | | style="text-align: center;" | [[File:spec_pilot_t1_desperate_flight2_icon.png|link=]] |
| style="text-align: center;" width=25%| Desperate Flight II |
| style="text-align: center;" width=25%| Desperate Flight II |
||
| style="text-align: left;"| {{color|cyan|Space Skill}} |
| style="text-align: left;"| {{color|cyan|Space Skill}} |
||
| Line 91: | Line 91: | ||
**Up to 20% max Bonus at 20% Hull |
**Up to 20% max Bonus at 20% Hull |
||
|- |
|- |
||
| − | | style="text-align: center;" | [[File:spec_pilot_t1_reckless_abandon_icon.png]] |
+ | | style="text-align: center;" | [[File:spec_pilot_t1_reckless_abandon_icon.png|link=]] |
| style="text-align: center;" width=25%| Reckless Abandon |
| style="text-align: center;" width=25%| Reckless Abandon |
||
| style="text-align: left;"| {{color|cyan|Space Skill}} |
| style="text-align: left;"| {{color|cyan|Space Skill}} |
||
| Line 104: | Line 104: | ||
'''Officer Training R&D School Unlock:''' |
'''Officer Training R&D School Unlock:''' |
||
*10 points spent - unlock: |
*10 points spent - unlock: |
||
| − | **Ability to craft [[ |
+ | **Ability to craft [[Specialization Qualification - Pilot|Pilot Specialization Qualification]] for Bridge Officers |
<hr/> |
<hr/> |
||
{| class="wikitable" style="font-size: 80%; line-height:1.25;" |
{| class="wikitable" style="font-size: 80%; line-height:1.25;" |
||
| Line 111: | Line 111: | ||
! style="text-align: left;"| Details |
! style="text-align: left;"| Details |
||
|- |
|- |
||
| − | | style="text-align: center;" | [[File:spec_pilot_t2_rock_and_roll_icon.png]] |
+ | | style="text-align: center;" | [[File:spec_pilot_t2_rock_and_roll_icon.png|link=]] |
| style="text-align: center;" width=25%| {{ability|Rock and Roll}}<br>''"Active"'' |
| style="text-align: center;" width=25%| {{ability|Rock and Roll}}<br>''"Active"'' |
||
| style="text-align: left;"| {{color|cyan|Space Skill}} |
| style="text-align: left;"| {{color|cyan|Space Skill}} |
||
| Line 120: | Line 120: | ||
*Turn Rate set to Zero |
*Turn Rate set to Zero |
||
|- |
|- |
||
| − | | style="text-align: center;" | [[File:spec_pilot_t2_all_shook_up_icon.png]] |
+ | | style="text-align: center;" | [[File:spec_pilot_t2_all_shook_up_icon.png|link=]] |
| style="text-align: center;" width=25%| All Shook Up I |
| style="text-align: center;" width=25%| All Shook Up I |
||
| style="text-align: left;"| {{color|cyan|Space Skill}} |
| style="text-align: left;"| {{color|cyan|Space Skill}} |
||
| Line 126: | Line 126: | ||
*+10% Defense for 10 sec, after using Rock and Roll |
*+10% Defense for 10 sec, after using Rock and Roll |
||
|- |
|- |
||
| − | | style="text-align: center;" | [[File:spec_pilot_t2_all_shook_up2_icon.png]] |
+ | | style="text-align: center;" | [[File:spec_pilot_t2_all_shook_up2_icon.png|link=]] |
| style="text-align: center;" width=25%| All Shook Up II |
| style="text-align: center;" width=25%| All Shook Up II |
||
| style="text-align: left;"| {{color|cyan|Space Skill}} |
| style="text-align: left;"| {{color|cyan|Space Skill}} |
||
| Line 132: | Line 132: | ||
*+20% Defense for 10 sec, after using Rock and Roll |
*+20% Defense for 10 sec, after using Rock and Roll |
||
|- |
|- |
||
| − | | style="text-align: center;" | [[File:spec_pilot_t2_magic_carpet_ride_icon.png]] |
+ | | style="text-align: center;" | [[File:spec_pilot_t2_magic_carpet_ride_icon.png|link=]] |
| style="text-align: center;" width=25%| Magic Carpet Ride I |
| style="text-align: center;" width=25%| Magic Carpet Ride I |
||
| style="text-align: left;"| {{color|cyan|Space Skill}} |
| style="text-align: left;"| {{color|cyan|Space Skill}} |
||
| Line 138: | Line 138: | ||
*+10% Turn Rate for 10 sec, after using Rock And Roll |
*+10% Turn Rate for 10 sec, after using Rock And Roll |
||
|- |
|- |
||
| − | | style="text-align: center;" | [[File:spec_pilot_t2_magic_carpet_ride2_icon.png]] |
+ | | style="text-align: center;" | [[File:spec_pilot_t2_magic_carpet_ride2_icon.png|link=]] |
| style="text-align: center;" width=25%| Magic Carpet Ride II |
| style="text-align: center;" width=25%| Magic Carpet Ride II |
||
| style="text-align: left;"| {{color|cyan|Space Skill}} |
| style="text-align: left;"| {{color|cyan|Space Skill}} |
||
| Line 158: | Line 158: | ||
! style="text-align: left;"| Details |
! style="text-align: left;"| Details |
||
|- |
|- |
||
| − | | style="text-align: center;" | [[File:spec_pilot_t3_turn_the_other_cheek_icon.png]] |
+ | | style="text-align: center;" | [[File:spec_pilot_t3_turn_the_other_cheek_icon.png|link=]] |
| style="text-align: center;" width=25%| Turn the Other Cheek I |
| style="text-align: center;" width=25%| Turn the Other Cheek I |
||
| style="text-align: left;"| {{color|cyan|Space Skill}} |
| style="text-align: left;"| {{color|cyan|Space Skill}} |
||
| Line 164: | Line 164: | ||
*On Damage: Reduces Damage to Shields by 5% to Opposite Shield Facing |
*On Damage: Reduces Damage to Shields by 5% to Opposite Shield Facing |
||
|- |
|- |
||
| − | | style="text-align: center;" | [[File:spec_pilot_t3_turn_the_other_cheek2_icon.png]] |
+ | | style="text-align: center;" | [[File:spec_pilot_t3_turn_the_other_cheek2_icon.png|link=]] |
| style="text-align: center;" width=25%| Turn the Other Cheek II |
| style="text-align: center;" width=25%| Turn the Other Cheek II |
||
| style="text-align: left;"| {{color|cyan|Space Skill}} |
| style="text-align: left;"| {{color|cyan|Space Skill}} |
||
| Line 170: | Line 170: | ||
*On Damage: Reduces Damage to Shields by 10% to Opposite Shield Facing |
*On Damage: Reduces Damage to Shields by 10% to Opposite Shield Facing |
||
|- |
|- |
||
| − | | style="text-align: center;" | [[File:spec_pilot_t3_turn_the_other_cheek3_icon.png]] |
+ | | style="text-align: center;" | [[File:spec_pilot_t3_turn_the_other_cheek3_icon.png|link=]] |
| style="text-align: center;" width=25%| Turn the Other Cheek III |
| style="text-align: center;" width=25%| Turn the Other Cheek III |
||
| style="text-align: left;"| {{color|cyan|Space Skill}} |
| style="text-align: left;"| {{color|cyan|Space Skill}} |
||
| Line 176: | Line 176: | ||
*On Damage: Reduces Damage to Shields by 20% to Opposite Shield Facing |
*On Damage: Reduces Damage to Shields by 20% to Opposite Shield Facing |
||
|- |
|- |
||
| − | | style="text-align: center;" | [[File:spec_pilot_t3_thick_of_it_icon.png]] |
+ | | style="text-align: center;" | [[File:spec_pilot_t3_thick_of_it_icon.png|link=]] |
| style="text-align: center;" width=25%| Thick of It I |
| style="text-align: center;" width=25%| Thick of It I |
||
| style="text-align: left;"| {{color|cyan|Space Skill}} |
| style="text-align: left;"| {{color|cyan|Space Skill}} |
||
| Line 182: | Line 182: | ||
*Immunity to All Damage for 2 sec |
*Immunity to All Damage for 2 sec |
||
|- |
|- |
||
| − | | style="text-align: center;" | [[File:spec_pilot_t3_thick_of_it2_icon.png]] |
+ | | style="text-align: center;" | [[File:spec_pilot_t3_thick_of_it2_icon.png|link=]] |
| style="text-align: center;" width=25%| Thick of It II |
| style="text-align: center;" width=25%| Thick of It II |
||
| style="text-align: left;"| {{color|cyan|Space Skill}} |
| style="text-align: left;"| {{color|cyan|Space Skill}} |
||
| Line 188: | Line 188: | ||
*Immunity to All Damage for 4 sec |
*Immunity to All Damage for 4 sec |
||
|- |
|- |
||
| − | | style="text-align: center;" | [[File:spec_pilot_t3_danger_zone_icon.png]] |
+ | | style="text-align: center;" | [[File:spec_pilot_t3_danger_zone_icon.png|link=]] |
| style="text-align: center;" width=25%| Danger Zone |
| style="text-align: center;" width=25%| Danger Zone |
||
| style="text-align: left;"| {{color|cyan|Space Skill}} |
| style="text-align: left;"| {{color|cyan|Space Skill}} |
||
| Line 194: | Line 194: | ||
*+2% Bonus All Damage per Foe within 2.0km |
*+2% Bonus All Damage per Foe within 2.0km |
||
|- |
|- |
||
| − | | style="text-align: center;" | [[File:spec_pilot_t3_wing_man_icon.png]] |
+ | | style="text-align: center;" | [[File:spec_pilot_t3_wing_man_icon.png|link=]] |
| style="text-align: center;" width=25%| Wing Man |
| style="text-align: center;" width=25%| Wing Man |
||
| style="text-align: left;"| {{color|cyan|Space Skill}} |
| style="text-align: left;"| {{color|cyan|Space Skill}} |
||
| Line 201: | Line 201: | ||
*+2% Bonus All Damage per Friend or Foe within 2.0km |
*+2% Bonus All Damage per Friend or Foe within 2.0km |
||
|- |
|- |
||
| − | | style="text-align: center;" | [[File: |
+ | | style="text-align: center;" | [[File:Specialization_Pilot_icon.png|link=]] |
| style="text-align: center;" width=25%| Scratch the Paint |
| style="text-align: center;" width=25%| Scratch the Paint |
||
| style="text-align: left;"| {{color|cyan|Space Skill}} |
| style="text-align: left;"| {{color|cyan|Space Skill}} |
||
| Line 207: | Line 207: | ||
*Immunity to Kinetic Damage from Warp Core Breach, once per 60 sec |
*Immunity to Kinetic Damage from Warp Core Breach, once per 60 sec |
||
|- |
|- |
||
| − | | style="text-align: center;" | [[File:spec_pilot_t3_impulse_drafting_icon.png]] |
+ | | style="text-align: center;" | [[File:spec_pilot_t3_impulse_drafting_icon.png|link=]] |
| style="text-align: center;" width=25%| Impulse Drafting I |
| style="text-align: center;" width=25%| Impulse Drafting I |
||
| style="text-align: left;"| {{color|cyan|Space Skill}} |
| style="text-align: left;"| {{color|cyan|Space Skill}} |
||
| − | Adds a Defense Bonus to each stack of Danger Zone, increasing your Defense for each Foe within 2.0km (and |
+ | Adds a Defense Bonus to each stack of Danger Zone, increasing your Defense for each Foe within 2.0km (and Friend, if "Wing Man" is active). |
*+1% Defense Bonus added to each stack of "Danger Zone" |
*+1% Defense Bonus added to each stack of "Danger Zone" |
||
|- |
|- |
||
| − | | style="text-align: center;" | [[File:spec_pilot_t3_impulse_drafting2_icon.png]] |
+ | | style="text-align: center;" | [[File:spec_pilot_t3_impulse_drafting2_icon.png|link=]] |
| style="text-align: center;" width=25%| Impulse Drafting II |
| style="text-align: center;" width=25%| Impulse Drafting II |
||
| style="text-align: left;"| {{color|cyan|Space Skill}} |
| style="text-align: left;"| {{color|cyan|Space Skill}} |
||
| − | Adds a Defense Bonus to each stack of Danger Zone, increasing your Defense for each Foe within 2.0km (and |
+ | Adds a Defense Bonus to each stack of Danger Zone, increasing your Defense for each Foe within 2.0km (and Friend, if "Wing Man" is active). |
*+2% Defense Bonus added to each stack of "Danger Zone" |
*+2% Defense Bonus added to each stack of "Danger Zone" |
||
|} |
|} |
||
| Line 226: | Line 226: | ||
'''Officer Training R&D School Unlock:''' |
'''Officer Training R&D School Unlock:''' |
||
*22 points spent - unlock: |
*22 points spent - unlock: |
||
| − | **Ability to craft [[Officer Training School/Pilot Training Manuals| |
+ | **Ability to craft [[Officer Training School/Pilot Training Manuals|Pilot Specialization Rank III Training Manuals]] for Bridge Officers |
'''Starship Trait Unlock:''' |
'''Starship Trait Unlock:''' |
||
*30 points spent - unlock: |
*30 points spent - unlock: |
||
| Line 236: | Line 236: | ||
! style="text-align: left;"| Details |
! style="text-align: left;"| Details |
||
|- |
|- |
||
| − | | style="text-align: center;" | [[File:spec_pilot_t4_bob_and_weave_icon.png]] |
+ | | style="text-align: center;" | [[File:spec_pilot_t4_bob_and_weave_icon.png|link=]] |
| style="text-align: center;" width=25%| Bob and Weave |
| style="text-align: center;" width=25%| Bob and Weave |
||
| style="text-align: left;"| When an enemy misses you in combat, you take the opportunity to hit them back, right where it hurts. Critical Severity is increased for each stack of "Bob and Weave" (up to 10 max). A successful Critical Hit removes all built up stacks of this buff. |
| style="text-align: left;"| When an enemy misses you in combat, you take the opportunity to hit them back, right where it hurts. Critical Severity is increased for each stack of "Bob and Weave" (up to 10 max). A successful Critical Hit removes all built up stacks of this buff. |
||
| Line 242: | Line 242: | ||
*All stacks removed on successful Critical Hit |
*All stacks removed on successful Critical Hit |
||
|- |
|- |
||
| − | | style="text-align: center;" | [[File:spec_pilot_t4_lone_wolf_icon.png]] |
+ | | style="text-align: center;" | [[File:spec_pilot_t4_lone_wolf_icon.png|link=]] |
| style="text-align: center;" width=25%| {{ability|Lone Wolf|I}}<br>''"Active"'' |
| style="text-align: center;" width=25%| {{ability|Lone Wolf|I}}<br>''"Active"'' |
||
| style="text-align: left;"| Take on the role of the Lone Wolf, single-handedly defeating the gathered foes and conquering the odds. Any players on your team that are within 10km will automatically Placate foes near them when you activate this, making you the only valid target in range for a short time. To survive the inevitable onslaught of incoming fire, the Lone Wolf gains increased Defense and automatic Shield Redistribution for the duration of this ability. |
| style="text-align: left;"| Take on the role of the Lone Wolf, single-handedly defeating the gathered foes and conquering the odds. Any players on your team that are within 10km will automatically Placate foes near them when you activate this, making you the only valid target in range for a short time. To survive the inevitable onslaught of incoming fire, the Lone Wolf gains increased Defense and automatic Shield Redistribution for the duration of this ability. |
||
| Line 250: | Line 250: | ||
*Team: Placate Foes within 10km for 10 sec (Placate removed if Foe takes __ Damage) |
*Team: Placate Foes within 10km for 10 sec (Placate removed if Foe takes __ Damage) |
||
|- |
|- |
||
| − | | style="text-align: center;" | [[File:spec_pilot_t4_lone_wolf2_icon.png]] |
+ | | style="text-align: center;" | [[File:spec_pilot_t4_lone_wolf2_icon.png|link=]] |
| style="text-align: center;" width=25%| {{ability|Lone Wolf|II}}<br>''"Active"'' |
| style="text-align: center;" width=25%| {{ability|Lone Wolf|II}}<br>''"Active"'' |
||
| style="text-align: left;"| Take on the role of the Lone Wolf, single-handedly defeating the gathered foes and conquering the odds. Any players on your team that are within 10km will automatically Placate foes near them when you activate this, making you the only valid target in range for a short time. To survive the inevitable onslaught of incoming fire, the Lone Wolf gains increased Defense and automatic Shield Redistribution for the duration of this ability. |
| style="text-align: left;"| Take on the role of the Lone Wolf, single-handedly defeating the gathered foes and conquering the odds. Any players on your team that are within 10km will automatically Placate foes near them when you activate this, making you the only valid target in range for a short time. To survive the inevitable onslaught of incoming fire, the Lone Wolf gains increased Defense and automatic Shield Redistribution for the duration of this ability. |
||
| Line 258: | Line 258: | ||
*Team: Placate Foes within 10km for 10 sec (Placate removed if Foe takes __ Damage; 8,416.3 at Level 60) |
*Team: Placate Foes within 10km for 10 sec (Placate removed if Foe takes __ Damage; 8,416.3 at Level 60) |
||
|- |
|- |
||
| − | | style="text-align: center;" | [[File:spec_pilot_t4_shield_scraping_icon.png]] |
+ | | style="text-align: center;" | [[File:spec_pilot_t4_shield_scraping_icon.png|link=]] |
| style="text-align: center;" width=25%| Shield Scraping I |
| style="text-align: center;" width=25%| Shield Scraping I |
||
| − | | style="text-align: left;"| Flying at high speed into the |
+ | | style="text-align: left;"| Flying at high speed into the shields of an enemy will drain their shield capacity and reduce their shield's resilience to incoming damage. The magnitude of both effects will scale with the speed at which you scrape against them. You may scrape against enemies once per second, but any enemy recently scraped will be immune to further scraping for 10 seconds. |
*-__ damage to All Shield Facings |
*-__ damage to All Shield Facings |
||
**(scales up to -__ @ 100% Throttle) |
**(scales up to -__ @ 100% Throttle) |
||
| Line 267: | Line 267: | ||
*Affected Foe immune to Scraping for 10sec |
*Affected Foe immune to Scraping for 10sec |
||
|- |
|- |
||
| − | | style="text-align: center;" | [[File:spec_pilot_t4_shield_scraping2_icon.png]] |
+ | | style="text-align: center;" | [[File:spec_pilot_t4_shield_scraping2_icon.png|link=]] |
| style="text-align: center;" width=25%| Shield Scraping II |
| style="text-align: center;" width=25%| Shield Scraping II |
||
| − | | style="text-align: left;"| Flying at high speed into the |
+ | | style="text-align: left;"| Flying at high speed into the shields of an enemy will drain their shield capacity and reduce their shield's resilience to incoming damage. The magnitude of both effects will scale with the speed at which you scrape against them. You may scrape against enemies once per second, but any enemy recently scraped will be immune to further scraping for 10 seconds. |
*-__ damage to All Shield Facings |
*-__ damage to All Shield Facings |
||
**(scales up to -__ @ 100% Throttle) |
**(scales up to -__ @ 100% Throttle) |
||
| Line 288: | Line 288: | ||
Space is the only playground of a Pilot. These officers focus their efforts exclusively on combat maneuverability in zero-gravity environments. |
Space is the only playground of a Pilot. These officers focus their efforts exclusively on combat maneuverability in zero-gravity environments. |
||
| + | ====Space Abilities==== |
||
<div class="leftcolumn"> |
<div class="leftcolumn"> |
||
| − | {| |
+ | {| style="font-size: 80%; line-height:1.25;" |
| + | |- |
||
| − | ! style="text-align: center;" colspan="2" | Space Abilities |
||
| + | | <br> |
||
|- |
|- |
||
| style="text-align: center;" width=10% rowspan="2" | {{abilityicon|Attack Pattern Lambda|Federation|40px}} |
| style="text-align: center;" width=10% rowspan="2" | {{abilityicon|Attack Pattern Lambda|Federation|40px}} |
||
| Line 297: | Line 299: | ||
| All of your outgoing weapon fire will confuse enemy targeting sensors. This results in reduced Accuracy and Perception for foes hit with weapon fire, as well as a chance to ''Confuse'' them into being unable to tell friend from foe for a short time. While active, you also benefit from an increase to your own Accuracy and Perception. |
| All of your outgoing weapon fire will confuse enemy targeting sensors. This results in reduced Accuracy and Perception for foes hit with weapon fire, as well as a chance to ''Confuse'' them into being unable to tell friend from foe for a short time. While active, you also benefit from an increase to your own Accuracy and Perception. |
||
|- |
|- |
||
| + | | <br> |
||
| − | | colspan="2" style="border-bottom: 1px solid slategray;"| |
||
|- |
|- |
||
| style="text-align: center;" width=10% rowspan="2" | {{abilityicon|Clean Getaway|Federation|40px}} |
| style="text-align: center;" width=10% rowspan="2" | {{abilityicon|Clean Getaway|Federation|40px}} |
||
| Line 304: | Line 306: | ||
| Get out while you can! Initiate a sensor burst that will give you a small window to flee from an ongoing firefight, while briefly increasing your own flight speed to help make good on your escape. |
| Get out while you can! Initiate a sensor burst that will give you a small window to flee from an ongoing firefight, while briefly increasing your own flight speed to help make good on your escape. |
||
|- |
|- |
||
| + | | <br> |
||
| − | | colspan="2" style="border-bottom: 1px solid slategray;"| |
||
|- |
|- |
||
| style="text-align: center;" width=10% rowspan="2" | {{abilityicon|Coolant Ignition|Federation|40px}} |
| style="text-align: center;" width=10% rowspan="2" | {{abilityicon|Coolant Ignition|Federation|40px}} |
||
| Line 311: | Line 313: | ||
| Eject a trail of impulse engine coolant in your wake, which will ignite after several seconds. Although more effective at both slowing and damaging ships than standard [[Ability: Eject Warp Plasma|Warp Plasma trails]], Coolant trails are unable to do both simultaneously. |
| Eject a trail of impulse engine coolant in your wake, which will ignite after several seconds. Although more effective at both slowing and damaging ships than standard [[Ability: Eject Warp Plasma|Warp Plasma trails]], Coolant trails are unable to do both simultaneously. |
||
|- |
|- |
||
| + | | <br> |
||
| − | | colspan="2" style="border-bottom: 1px solid slategray;"| |
||
|- |
|- |
||
| style="text-align: center;" width=10% rowspan="2" | {{abilityicon|Deploy Countermeasures|Federation|40px}} |
| style="text-align: center;" width=10% rowspan="2" | {{abilityicon|Deploy Countermeasures|Federation|40px}} |
||
| Line 318: | Line 320: | ||
| Release a swarm of target-masking probes that will instantly detonate any nearby torpedoes. Your ship will become temporarily immune to smaller projectiles that might slip through the probe swarm. Enemy small craft may also become ''Confused''. |
| Release a swarm of target-masking probes that will instantly detonate any nearby torpedoes. Your ship will become temporarily immune to smaller projectiles that might slip through the probe swarm. Enemy small craft may also become ''Confused''. |
||
|- |
|- |
||
| + | | <br> |
||
| − | | colspan="2" style="border-bottom: 1px solid slategray;"| |
||
|- |
|- |
||
| style="text-align: center;" width=10% rowspan="2" | {{abilityicon|Fly Her Apart|Federation|40px}} |
| style="text-align: center;" width=10% rowspan="2" | {{abilityicon|Fly Her Apart|Federation|40px}} |
||
| Line 325: | Line 327: | ||
| Activating this toggle will give your ship a speed that gradually increases the longer it is maintained, but will degrade your hull each second that passes. When the toggle ends, or is deactivated, you gain a damage buff that scales up with the amount of time the toggle was maintained. |
| Activating this toggle will give your ship a speed that gradually increases the longer it is maintained, but will degrade your hull each second that passes. When the toggle ends, or is deactivated, you gain a damage buff that scales up with the amount of time the toggle was maintained. |
||
|- |
|- |
||
| + | | <br> |
||
| − | | colspan="2" style="border-bottom: 1px solid slategray;"| |
||
|- |
|- |
||
| style="text-align: center;" width=10% rowspan="2" | {{abilityicon|Form Up|Federation|40px}} |
| style="text-align: center;" width=10% rowspan="2" | {{abilityicon|Form Up|Federation|40px}} |
||
| Line 335: | Line 337: | ||
<div class="rightcolumn"> |
<div class="rightcolumn"> |
||
| − | {| |
+ | {| style="font-size: 80%; line-height:1.25;" |
| + | |- |
||
| − | ! style="text-align: center;" colspan="2" | Space Abilities |
||
| + | | <br> |
||
|- |
|- |
||
| style="text-align: center;" width=10% rowspan="2" | {{abilityicon|Hold Together|Federation|40px}} |
| style="text-align: center;" width=10% rowspan="2" | {{abilityicon|Hold Together|Federation|40px}} |
||
| Line 343: | Line 346: | ||
| Regenerate your hull over time, while also removing hazardous debuffs from your vessel. This effect is increased by high speeds, so remaining at full Throttle grants a much larger effectiveness. |
| Regenerate your hull over time, while also removing hazardous debuffs from your vessel. This effect is increased by high speeds, so remaining at full Throttle grants a much larger effectiveness. |
||
|- |
|- |
||
| + | | <br> |
||
| − | | colspan="2" style="border-bottom: 1px solid slategray;"| |
||
|- |
|- |
||
| style="text-align: center;" width=10% rowspan="2" | {{abilityicon|Lock Trajectory|Federation|40px}} |
| style="text-align: center;" width=10% rowspan="2" | {{abilityicon|Lock Trajectory|Federation|40px}} |
||
| Line 350: | Line 353: | ||
| Expert control over thrust vectors allows you to send your starship into a controlled skid, maintaining its current trajectory and speed, but allowing it to turn freely. |
| Expert control over thrust vectors allows you to send your starship into a controlled skid, maintaining its current trajectory and speed, but allowing it to turn freely. |
||
|- |
|- |
||
| + | | <br> |
||
| − | | colspan="2" style="border-bottom: 1px solid slategray;"| |
||
|- |
|- |
||
| style="text-align: center;" width=10% rowspan="2" | {{abilityicon|Pilot Team|Federation|40px}} |
| style="text-align: center;" width=10% rowspan="2" | {{abilityicon|Pilot Team|Federation|40px}} |
||
| Line 357: | Line 360: | ||
| Enhance the speed and turn rate of yourself or one ally within 10km. While used on the target, it also grants a short-term immunity to all movement-impairing effects. |
| Enhance the speed and turn rate of yourself or one ally within 10km. While used on the target, it also grants a short-term immunity to all movement-impairing effects. |
||
|- |
|- |
||
| + | | <br> |
||
| − | | colspan="2" style="border-bottom: 1px solid slategray;"| |
||
|- |
|- |
||
| style="text-align: center;" width=10% rowspan="2" | {{abilityicon|Reinforcements Squadron|Federation|40px}} |
| style="text-align: center;" width=10% rowspan="2" | {{abilityicon|Reinforcements Squadron|Federation|40px}} |
||
| Line 364: | Line 367: | ||
| Call in a squadron of small craft to aid you, or the targeted ally, in their current combat. These nimble allies will assist who ever they are designated to at the time of activation, and will continue engaging enemies in the area for up to 45 seconds, or until shortly after combat ends. |
| Call in a squadron of small craft to aid you, or the targeted ally, in their current combat. These nimble allies will assist who ever they are designated to at the time of activation, and will continue engaging enemies in the area for up to 45 seconds, or until shortly after combat ends. |
||
|- |
|- |
||
| + | | <br> |
||
| − | | colspan="2" style="border-bottom: 1px solid slategray;"| |
||
|- |
|- |
||
| style="text-align: center;" width=10% rowspan="2" | {{abilityicon|Reroute Reserves to Weapons|Federation|40px}} |
| style="text-align: center;" width=10% rowspan="2" | {{abilityicon|Reroute Reserves to Weapons|Federation|40px}} |
||
| Line 371: | Line 374: | ||
| By shunting the impulse manifolds into your weapons arrays, the drain usually associated with energy weapon activation can pull from your Engine Subsystem instead of Weapons. While this effect is in place, the firing cycles of all active energy weapons will cycle more quickly. |
| By shunting the impulse manifolds into your weapons arrays, the drain usually associated with energy weapon activation can pull from your Engine Subsystem instead of Weapons. While this effect is in place, the firing cycles of all active energy weapons will cycle more quickly. |
||
|- |
|- |
||
| + | | <br> |
||
| − | | colspan="2" style="border-bottom: 1px solid slategray;"| |
||
|- |
|- |
||
| style="text-align: center;" width=10% rowspan="2" | {{abilityicon|Subspace Boom|Federation|40px}} |
| style="text-align: center;" width=10% rowspan="2" | {{abilityicon|Subspace Boom|Federation|40px}} |
||
| Line 382: | Line 385: | ||
{{clear}} |
{{clear}} |
||
| − | ==Pilot |
+ | ==Pilot Starships== |
| − | {{wip}} |
||
The following playable starships can be classified as ''Pilot Starships'': |
The following playable starships can be classified as ''Pilot Starships'': |
||
| + | {| |
||
| − | <div class="leftcolumn"> |
||
| + | | valign="top" | |
||
| ⚫ | |||
| + | <DPL> |
||
| + | category=Pilot starships |
||
| + | category=Federation starship types |
||
| + | format=,\n*[[File:Faction Federation.png|16px|link=]] [[%PAGE%]] |
||
| + | allowcachedresults=true |
||
| + | ordermethod=firstedit |
||
| ⚫ | |||
| + | | valign="top" | |
||
| + | <DPL> |
||
| + | category=Pilot starships |
||
| + | category=Klingon starship types |
||
| + | format=,\n*[[File:Faction Klingon.png|16px|link=]] [[%PAGE%]] |
||
| + | allowcachedresults=true |
||
| + | ordermethod=firstedit |
||
| ⚫ | |||
| + | | valign="top" | |
||
| + | <DPL> |
||
| + | category=Pilot starships |
||
| + | category=Romulan Republic starship types |
||
| + | format=,\n*[[File:Faction Romulan.png|16px|link=]] [[%PAGE%]] |
||
| + | allowcachedresults=true |
||
| + | ordermethod=firstedit |
||
| + | </DPL> |
||
| + | <DPL> |
||
| + | category=Pilot starships |
||
| + | category=Cross-Faction starship types |
||
| + | format=,\n*[[File:Faction Cross-Faction.png|18px|link=]] [[%PAGE%]] |
||
| + | allowcachedresults=true |
||
| + | ordermethod=firstedit |
||
| + | </DPL> |
||
| + | |} |
||
| − | <div class="rightcolumn"> |
||
| ⚫ | |||
| − | {{clear}} |
||
===Pilot Maneuvers=== |
===Pilot Maneuvers=== |
||
| + | All Pilot starships are capable of performing four special {{ability|Pilot Maneuvers}}: ''Afterburners'', ''Left'' and ''Right Barrel Roll'', and ''Retrorockets''. |
||
| + | |||
| + | Much like how players are able to perform active dodging/rolls on ground, these starships can perform these maneuvers by double tapping in the direction they’d like to perform a special maneuver. These maneuvers can be rebound to different keys, or activated manually from a UI element if the player so desires. After activating a Pilot Maneuver player will be briefly immune to damage. |
||
===Hybrid Seating=== |
===Hybrid Seating=== |
||
| Line 399: | Line 432: | ||
:''[[List of starships with Pilot seating|See main article: List of starships with Pilot seating]]'' |
:''[[List of starships with Pilot seating|See main article: List of starships with Pilot seating]]'' |
||
| − | A large number of playable Tier 6 starships come with either an ''Ensign'', ''Lieutenant'' or ''Lieutenant |
+ | A large number of playable Tier 6 starships come with either an ''Ensign'', ''Lieutenant'' or ''Lieutenant Commander Pilot'' BOff seating. However, these ships lack the built-in Pilot Maneuvers, and are thus not considered to be ''Pilot Starships''. |
{{Captain specialization}} |
{{Captain specialization}} |
||
| + | [[Category:Captain specializations|Pilot]] |
||
| + | [[Category:Delta Rising]] |
||
| + | [[Category:Season Ten: The Iconian War]] |
||
Revision as of 18:28, 16 October 2020
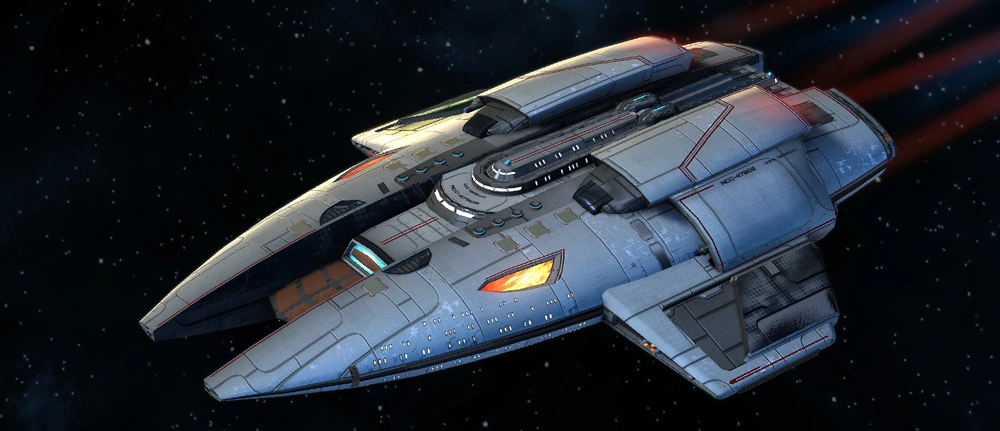

Pilot starships, a new generation of highly agile Escorts and Raiders.
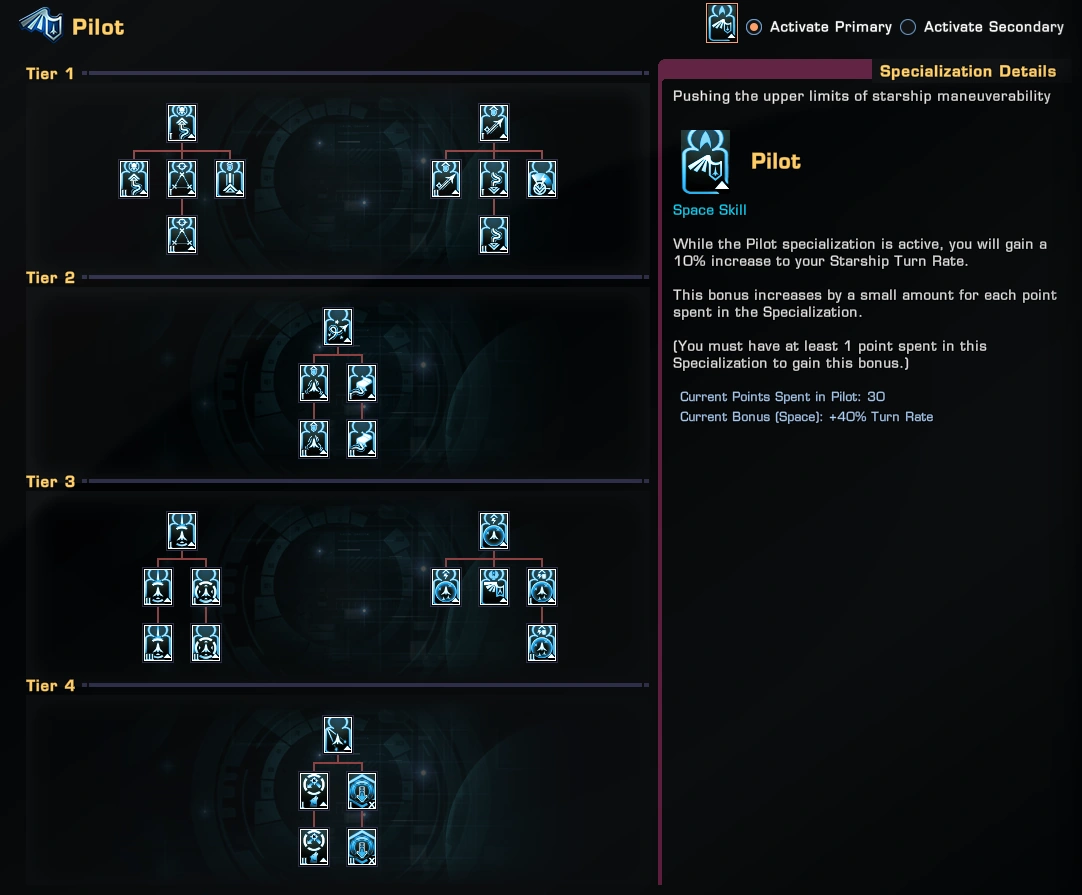
The Pilot Specialization tree.
Pushing the upper limits of starship maneuverability.
The Pilot Specialization is a Captain Specialization released with Delta Rising as a Secondary Specialization. It was expanded into a full Primary Specialization later, with the release of Season 10. Players trained in this specialization can improve the Turn Rate, Flight Speed and Defense of their starships.
Pilot
Space Skill
While the Pilot specialization is active, you will gain a 10% increase to your Starship Turn Rate.
This bonus increases by a small amount for each point spent in the Specialization.
(You must have at least 1 point spent in this Specialization to gain this bonus.)
Scaling bonus:
 +10% base +1% turn rate per point spent (maximum of 40%)
Tiers Overview
Available by default.
| Title | Details | |
|---|---|---|
| Maneuvering Thrusters I | Space Skill
While at Full Stop, or if your engines are Offline, you are still able to utilize your ship's maneuvering thrusters as if the ship retained a small portion of its base speed and turn rate.
| |
| Maneuvering Thrusters II | Space Skill
While at Full Stop, or if your engines are Offline, you are still able to utilize your ship's maneuvering thrusters as if the ship retained a small portion of its base speed and turn rate.
| |
| Attack Pattern Expertise I | Space Skill
Activating any Attack Pattern Bridge Officer Ability grants your starship an increase in survivability, represented as temporary hitpoints. Activating an additional Attack Pattern while already under these effects will refresh the pool, not stack them.
| |
| Attack Pattern Expertise II | Space Skill
Activating any Attack Pattern Bridge Officer Ability grants your starship an increase in survivability, represented as temporary hitpoints. Activating an additional Attack Pattern while already under these effects will refresh the pool, not stack them.
| |
| Back Her Off! | Space Skill
Your defense and maximum speed are increased while moving in Reverse. (Only recommended in short bursts.)
| |
| Eat My Dust I | Space Skill
When an attacker fires upon the rear arc of your ship, you gain a stacking bonus to your defense, making your ship harder to hit.
| |
| Eat My Dust II | Space Skill
When an attacker fires upon the rear arc of your ship, you gain a stacking bonus to your defense, making your ship harder to hit.
| |
| Desperate Flight I | Space Skill
As the hull of your ship takes increasing amounts of damage, your flight speed and turn rate will rise higher and higher. This bonus is not applied until your Hull is below 80% capacity, and caps out when you are at 20% Hull.
| |
| Desperate Flight II | Space Skill
As the hull of your ship takes increasing amounts of damage, your flight speed and turn rate will rise higher and higher. This bonus is not applied until your Hull is below 80% capacity, and caps out when you are at 20% Hull.
| |
| Reckless Abandon | Space Skill
Activating Evasive Maneuvers now grants you brief immunity to all movement-impairing effects. This includes any of the following effects: Slow, Root, Hold, Engines Offline, Repel
|
Unlocks after choosing 5 abilities from this specialization.
Officer Training R&D School Unlock:
- 10 points spent - unlock:
- Ability to craft Pilot Specialization Qualification for Bridge Officers
| Title | Details | |
|---|---|---|
| Rock and Roll "Active" |
Space Skill
Send your ship into a roll, evading most incoming attacks and rendering your ship temporarily impervious to incoming damage.
| |
| All Shook Up I | Space Skill
After executing the "Rock and Roll" maneuver, your ship remains more difficult to hit with weapons for a short duration.
| |
| All Shook Up II | Space Skill
After executing the "Rock and Roll" maneuver, your ship remains more difficult to hit with weapons for a short duration.
| |
| Magic Carpet Ride I | Space Skill
After executing the "Rock and Roll" maneuver, you retain a large turn rate bonus for a short period of time.
| |
| Magic Carpet Ride II | Space Skill
After executing the "Rock and Roll" maneuver, you retain a large turn rate bonus for a short period of time.
|
Unlocks after choosing 10 abilities from this specialization.
Starship Trait Unlock:
- 15 points spent - unlock:
 Pedal to the Metal (+1% All Damage boost (stacks 10 times) for maintaining 100% throttle)
| Title | Details | |
|---|---|---|
| Turn the Other Cheek I | Space Skill
Taking damage applies a temporary boost to Shield Hardness on the opposite facing from the one damaged. (All four facings may be enhanced at the same time.)
| |
| Turn the Other Cheek II | Space Skill
Taking damage applies a temporary boost to Shield Hardness on the opposite facing from the one damaged. (All four facings may be enhanced at the same time.)
| |
| Turn the Other Cheek III | Space Skill
Taking damage applies a temporary boost to Shield Hardness on the opposite facing from the one damaged. (All four facings may be enhanced at the same time.)
| |
| Thick of It I | Space Skill
Whenever "Turn the Other Cheek" becomes active on all four of your shield facings at the same time, you are granted a brief period of complete damage immunity. May only occur once every 30 seconds.
| |
| Thick of It II | Space Skill
Whenever "Turn the Other Cheek" becomes active on all four of your shield facings at the same time, you are granted a brief period of complete damage immunity. May only occur once every 30 seconds.
| |
| Danger Zone | Space Skill
You gain a bonus to your damage output for each Foe within 2.0km of your ship. This bonus can stack up to 10 times maximum. (Does not apply to Mines, Turrets or Targetable Torpedoes)
| |
| Wing Man | Space Skill
Extends the effects of "Danger Zone" to count allies as well. You gain a bonus to your damage output for each Friend or Foe within 2.0km of your ship. This bonus can stack up to 10 times maximum. (Does not apply to Mines, Turrets or Targetable Torpedoes)
| |
| Scratch the Paint | Space Skill
You become immune to one Warp Core Breach, as long as this is active. Being hit by a Warp Core Breach removes the effect, but it automatically refreshes after some time has passed.
| |
| Impulse Drafting I | Space Skill
Adds a Defense Bonus to each stack of Danger Zone, increasing your Defense for each Foe within 2.0km (and Friend, if "Wing Man" is active).
| |
| Impulse Drafting II | Space Skill
Adds a Defense Bonus to each stack of Danger Zone, increasing your Defense for each Foe within 2.0km (and Friend, if "Wing Man" is active).
|
Unlocks after choosing 15 abilities from this specialization.
Officer Training R&D School Unlock:
- 22 points spent - unlock:
- Ability to craft Pilot Specialization Rank III Training Manuals for Bridge Officers
Starship Trait Unlock:
- 30 points spent - unlock:
- Improved Pedal to the Metal (+2% All Damage boost (stacks 10 times) for maintaining 100% throttle)
| Title | Details | |
|---|---|---|
| Bob and Weave | When an enemy misses you in combat, you take the opportunity to hit them back, right where it hurts. Critical Severity is increased for each stack of "Bob and Weave" (up to 10 max). A successful Critical Hit removes all built up stacks of this buff.
| |
| Lone Wolf I "Active" |
Take on the role of the Lone Wolf, single-handedly defeating the gathered foes and conquering the odds. Any players on your team that are within 10km will automatically Placate foes near them when you activate this, making you the only valid target in range for a short time. To survive the inevitable onslaught of incoming fire, the Lone Wolf gains increased Defense and automatic Shield Redistribution for the duration of this ability.
The Placate effect granted to allies is Fragile to their own damage, it will wear off quickly.
| |
| Lone Wolf II "Active" |
Take on the role of the Lone Wolf, single-handedly defeating the gathered foes and conquering the odds. Any players on your team that are within 10km will automatically Placate foes near them when you activate this, making you the only valid target in range for a short time. To survive the inevitable onslaught of incoming fire, the Lone Wolf gains increased Defense and automatic Shield Redistribution for the duration of this ability.
The Placate effect granted to allies is Fragile to their own damage, it will wear off quickly.
| |
| Shield Scraping I | Flying at high speed into the shields of an enemy will drain their shield capacity and reduce their shield's resilience to incoming damage. The magnitude of both effects will scale with the speed at which you scrape against them. You may scrape against enemies once per second, but any enemy recently scraped will be immune to further scraping for 10 seconds.
| |
| Shield Scraping II | Flying at high speed into the shields of an enemy will drain their shield capacity and reduce their shield's resilience to incoming damage. The magnitude of both effects will scale with the speed at which you scrape against them. You may scrape against enemies once per second, but any enemy recently scraped will be immune to further scraping for 10 seconds.
|
Pilot Officers
Any Tactical, Engineering or Science Bridge Officer can be trained in Pilot specialization by using the [Specialization Qualification - Pilot]. Said item is unlocked for crafting in the Officer Training R&D School once 10 points have been spent in Pilot Specialization, or may be purchased from the Exchange.
Common Pilot Specialist Bridge Officers can also be purchased from Bridge Officer Requisition Officer for a modest dilithium fee.
Bridge Officer Abilities
Space is the only playground of a Pilot. These officers focus their efforts exclusively on combat maneuverability in zero-gravity environments.
Space Abilities
| Attack Pattern Lambda | |
| All of your outgoing weapon fire will confuse enemy targeting sensors. This results in reduced Accuracy and Perception for foes hit with weapon fire, as well as a chance to Confuse them into being unable to tell friend from foe for a short time. While active, you also benefit from an increase to your own Accuracy and Perception. | |
| Clean Getaway | |
| Get out while you can! Initiate a sensor burst that will give you a small window to flee from an ongoing firefight, while briefly increasing your own flight speed to help make good on your escape. | |
| Coolant Ignition | |
| Eject a trail of impulse engine coolant in your wake, which will ignite after several seconds. Although more effective at both slowing and damaging ships than standard Warp Plasma trails, Coolant trails are unable to do both simultaneously. | |
| Deploy Countermeasures | |
| Release a swarm of target-masking probes that will instantly detonate any nearby torpedoes. Your ship will become temporarily immune to smaller projectiles that might slip through the probe swarm. Enemy small craft may also become Confused. | |
| Fly Her Apart | |
| Activating this toggle will give your ship a speed that gradually increases the longer it is maintained, but will degrade your hull each second that passes. When the toggle ends, or is deactivated, you gain a damage buff that scales up with the amount of time the toggle was maintained. | |
| Form Up | |
| Instantly jump into a formation position with the targeted ally. Both you and the targeted ally will receive a damage bonus as long as you remain within a short distance of one another for the duration of the ability. |
| Hold Together | |
| Regenerate your hull over time, while also removing hazardous debuffs from your vessel. This effect is increased by high speeds, so remaining at full Throttle grants a much larger effectiveness. | |
| Lock Trajectory | |
| Expert control over thrust vectors allows you to send your starship into a controlled skid, maintaining its current trajectory and speed, but allowing it to turn freely. | |
| Pilot Team | |
| Enhance the speed and turn rate of yourself or one ally within 10km. While used on the target, it also grants a short-term immunity to all movement-impairing effects. | |
| Reinforcements Squadron | |
| Call in a squadron of small craft to aid you, or the targeted ally, in their current combat. These nimble allies will assist who ever they are designated to at the time of activation, and will continue engaging enemies in the area for up to 45 seconds, or until shortly after combat ends. | |
| Reroute Reserves to Weapons | |
| By shunting the impulse manifolds into your weapons arrays, the drain usually associated with energy weapon activation can pull from your Engine Subsystem instead of Weapons. While this effect is in place, the firing cycles of all active energy weapons will cycle more quickly. | |
| Subspace Boom | |
| Initiate a sudden and violent warp burst that sends out shockwaves in subspace. These distortions will deal minor damage to foes that scales up with your Throttle value at the time of activation. The area remains hazardous to travel for several seconds, inflicting defense and movement debuffs on any enemies caught in the region. |
Pilot Starships
The following playable starships can be classified as Pilot Starships:
Pilot Maneuvers
All Pilot starships are capable of performing four special Pilot Maneuvers: Afterburners, Left and Right Barrel Roll, and Retrorockets.
Much like how players are able to perform active dodging/rolls on ground, these starships can perform these maneuvers by double tapping in the direction they’d like to perform a special maneuver. These maneuvers can be rebound to different keys, or activated manually from a UI element if the player so desires. After activating a Pilot Maneuver player will be briefly immune to damage.
Hybrid Seating
All Pilot Starships feature a Commander Pilot Bridge Officer seat. Some of these ships feature an additional, lower ranking Pilot BOff seating.
Other playable ships with Pilot BOff seat
A large number of playable Tier 6 starships come with either an Ensign, Lieutenant or Lieutenant Commander Pilot BOff seating. However, these ships lack the built-in Pilot Maneuvers, and are thus not considered to be Pilot Starships.
| Captain Specializations | |
|---|---|
| Primary & Secondary | Secondary |
| Command Officer • Intelligence Officer • Miracle Worker • Pilot • Temporal Operative | Constable • Commando • Strategist |