This '''Guide to Cryptic's "The Foundry"''' will teach you the basics to design and create your own [[missions]] for [[Star Trek Online]] with [[The Foundry|The Foundry (Beta)]].
== Getting started ==
== Getting started ==
To gain access to the Foundry, you need to sign up for the [[Tribble (server)|Tribble test server]].
To gain access to the Foundry, you need to sign up for the [[Tribble (server)|Tribble test server]].
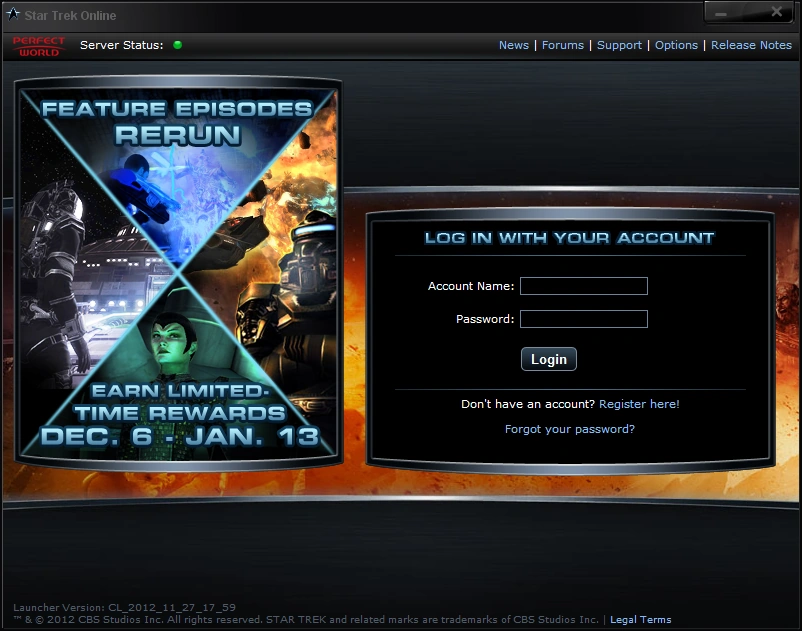
[[File: Game Launcher.png|thumb|238px|right|The game launcher]] {{Notebox|It is important to wait for the launcher to perform any updates for Holodeck first, since there is a bug preventing you to immediately fire up Tribble.}} Then start the [[game launcher]] and let perform any updates. When the big bottom left button reads "Engage", click "Tribble - Test Shard". Wait for the launcher to perform any patches. Click "Engage".{{clear}}
+
+
[[File: Foundry Create Content.jpg|thumb|238px|right|Create Content tab]] In the [[Character]] selection screen click the new tab "Create Content". You will need to create at least one dedicated character to use the Foundry. For this purpose, you are granted an additional character slot. Note that you need a [[Federation]] character to test [[Starfleet]] missions and a [[Klingon]] character to test [[KDF]] missions.{{clear}}
+
+
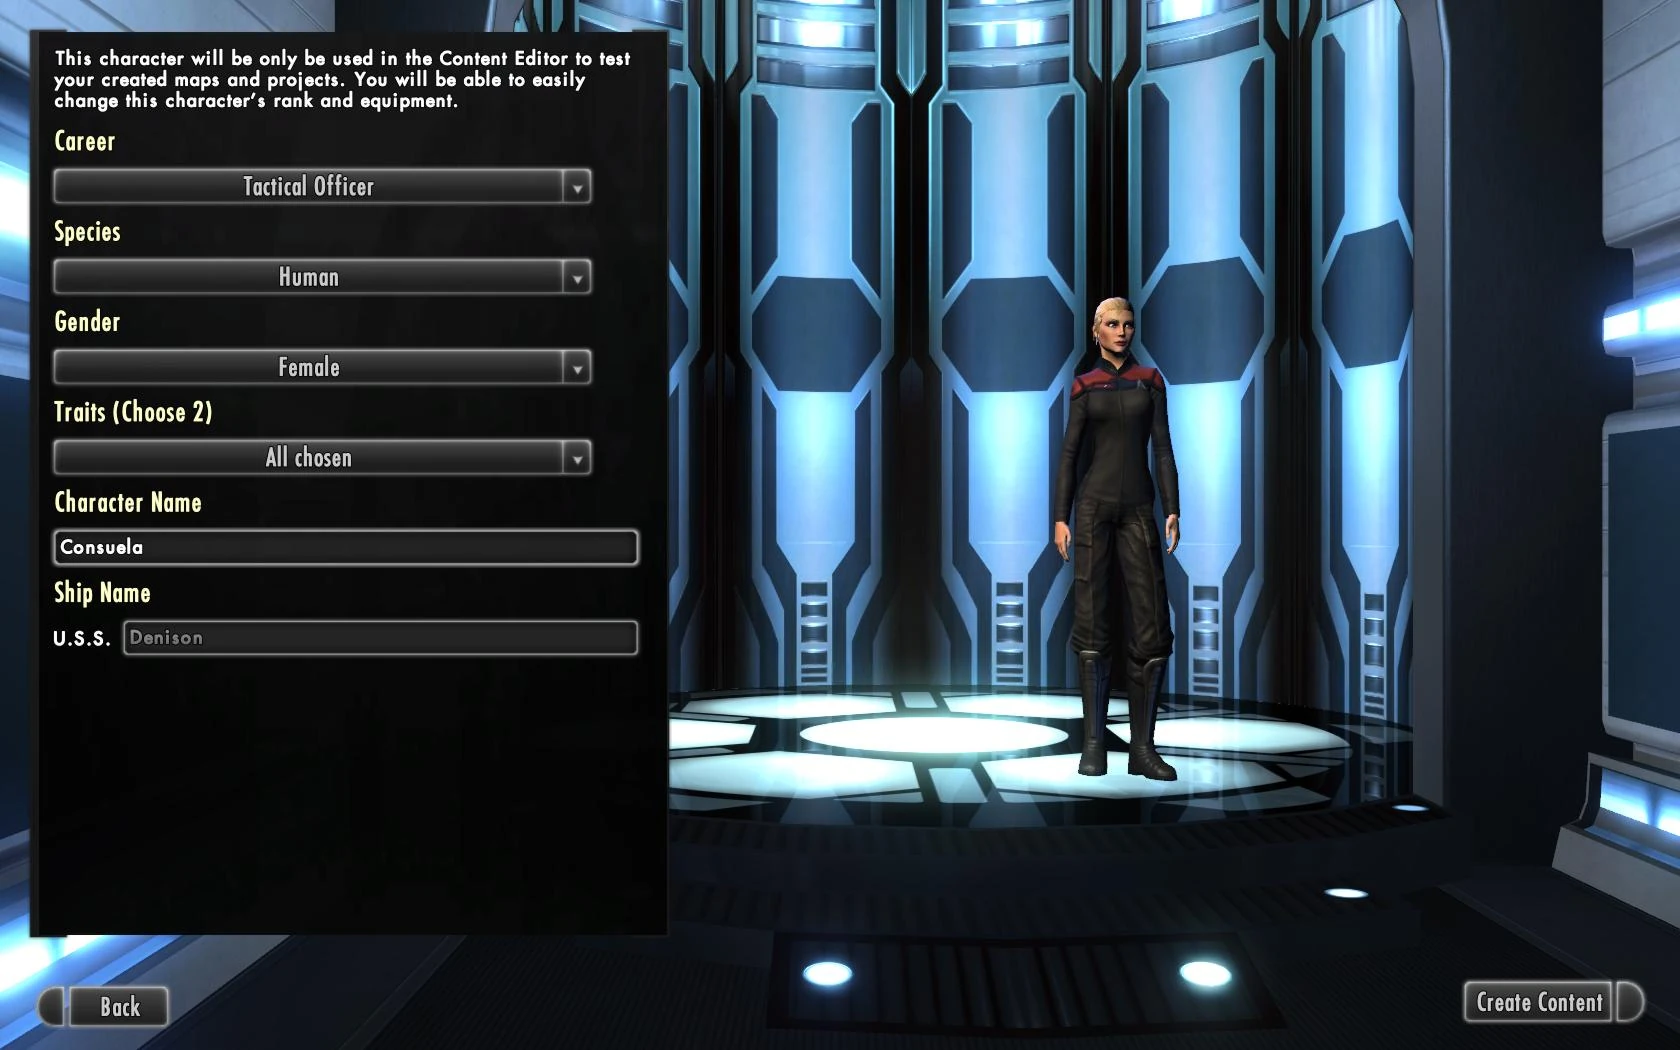
[[File: Foundry Character Creation.jpg|thumb|238px|right|Create a character for testing]]You are not given a lot of options to customize the test character. You may find that disturbing at first, but rest assured, you will only need the character as sort of dummy that is able to move, trigger dialogs and interact with objects. It is not a regular character that you will level up or should care about. In fact you are about to delete him or her quite often to switch between Federation and Klingon content. Simply hit "Create Content" to fire up the Foundry.{{clear}}
+
+
== Manage projects ==
+
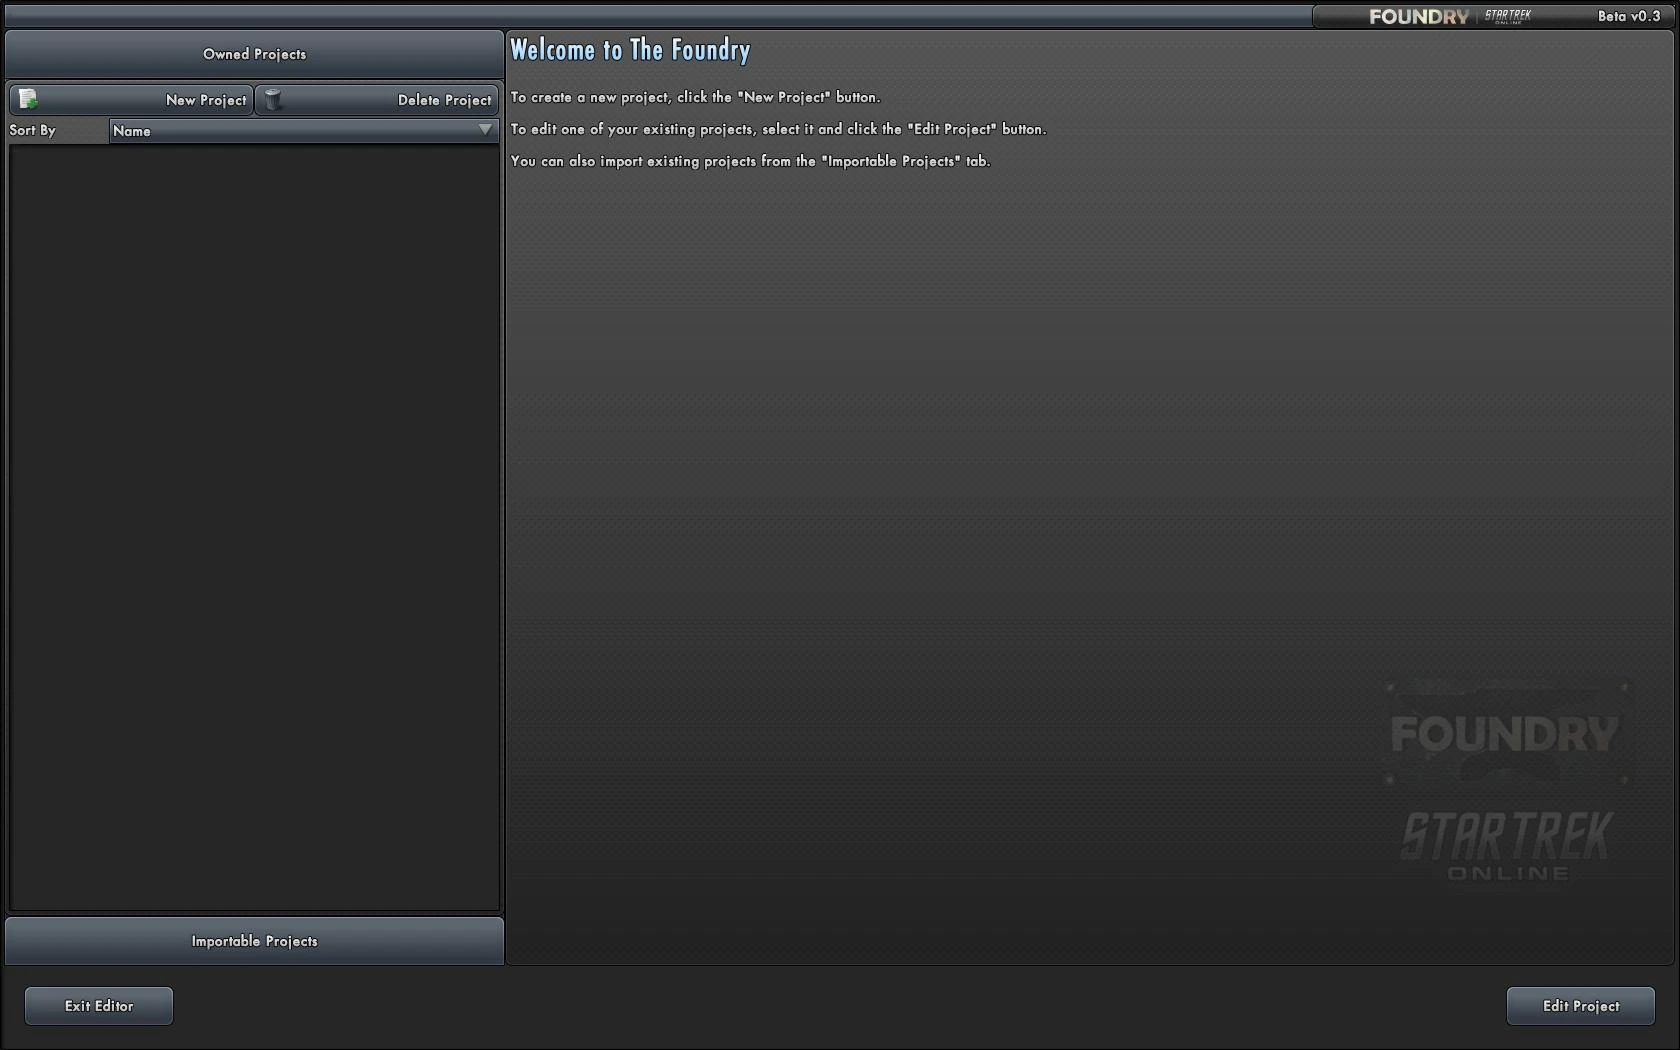
[[File:Foundry Start Screen.jpg|right|thumb|238px|Foundry project management screen]] When you select a character from the "Create Content" screen (or created a new one), you will be redirected to the project management screen of the foundry. Each mission you design is called "project" in the terminology of the Foundry. Projects are bound to your [[Account]], not the testing character. So you will never lose any UGC mission when you delete one or all testing characters.
+
+
On the left hand side under "Owned Projects" you will see an alphabetic listing of all your projects by name. On top of this listing you have the options to Start a new project, delete a selected project and sort the list by other criteria. When you have already created projects, you may select any of them from the list to see a project summary, including user ratings for that mission.
+
{{Notebox|Importing is a future feature and has not yet been implemented.}} At the bottom of the column you can switch to a second project listing. This listing contains shared projects that you may import to work collaboratively with other users.
+
+
=== Create a New Project ===
+
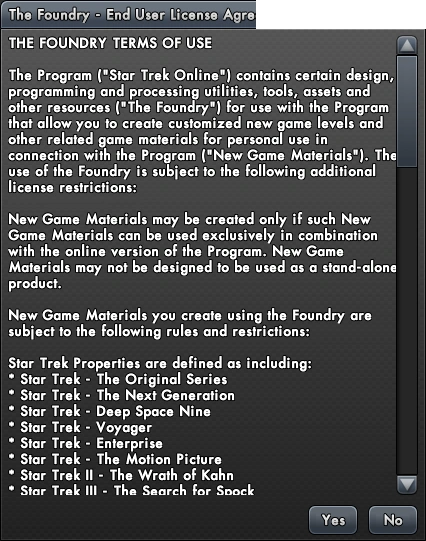
[[File: Foundry New Project.png|right]] In order to write a mission you need to start a new project. Click "New Project" in the top left. The EULA for The Foundry will appear and you have to accept the terms of use to continue. The following is a short, incomplete overview of what you may do or not do:
+
[[File: Foundry_End_User_Licence_Agreement.png|thumb|right|238px|The EULA]]* Use character names from any show and the first ten movies
+
* But not their likeliness (i.e. it ok to talk about "Data", but not to create an NPC that looks like Brent Spiner)
+
* Don't be to critical or controversial with your story telling. Check the paragraphs about political, religious and other topics.
+
* Do not display the use of any drugs (even legal administration by doctors)
+
* Do not display people with disabilities (VISOR etc.)
+
* Do not include any URLs (e.g. link to your blog or fleet forum)
+
: '''''Important Disclaimer:''' Read and understand the EULA for yourself and do not rely on information from STOWiki.org to decide what you do and don't do in your mission. The EULA is subject to change and STOWiki.org can not take any liability for the accuracy of the above!''
+
+
Click "Yes" to continue. {{clear}}
+
+
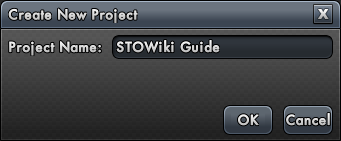
[[File: Foundry Create New Project.png|thumb|right|238px|Name your project]] The Foundry asks you to enter a name for your project. This is the name by which [[player]]s will know your mission, i.e. the name of the mission in the mission journal, search pages and so on. The name may be changed later on, but changing the name may cause player's to lose track of the mission, since it cannot longer be found by the original name.
+
+
Click "OK" to create and load the project.{{clear}}
+
+
== Editing a project ==
+
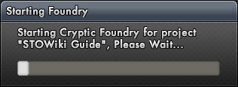
[[File: Foundry Starting Foundry.png|thumb|right|238px|Loading a project]] After selecting an existing project from the project management screen and clicking "Edit Project", or the successful creation of a new project as described above, the Foundry will load this project for you to edit. This might take a while.{{clear}}
+
+
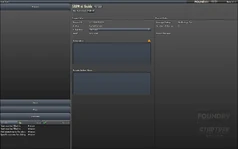
[[File:Foundry Pristine Project.jpg|thumb|right|238px|The Foundry]] When loading is complete, you will be send to the main Foundry editor interface. Let's take a quick tour. {{clear}}
+
+
==== Sidebar ====
+
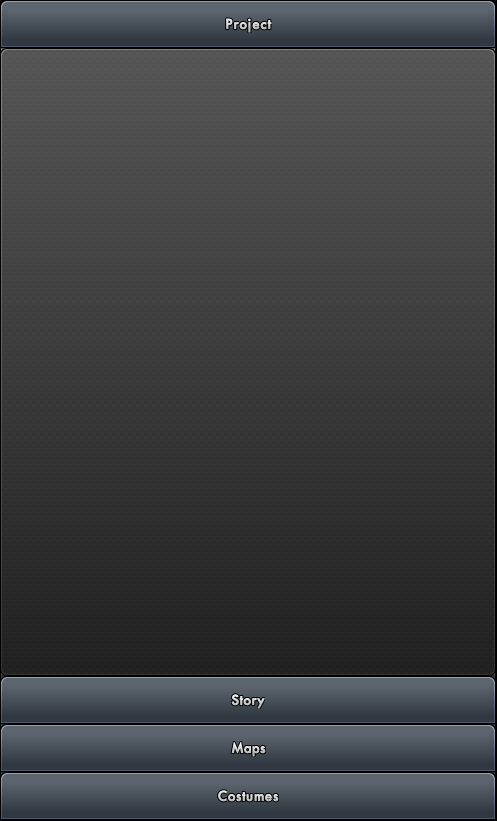
[[File: Foundry Project Explorer.png|right|thumb|238px|The sidebar lets you browse your project]] Like many [[wikipedia:Integrated Development Environment|IDE]]s, The Foundry has a sidebar in which you can navigate through your project. There are four sections between you may toggle.
+
* Project: Used to review comments and publish updates of the mission to the game
+
* Story: Used to create mission objectives and dialog and link maps to . Also lets you test play the mission from start to finish
+
* Maps: Used to create and edit maps. Here you place NPCs, enemy mobs, objects to interact with and waypoints. Also you can test play individual maps.
+
* Costumes: Used to create and customize the appearance of NPCs and ships.
+
+
We will discuss the individual sections in detail.{{clear}}
+
+
==== Tasks ====
+
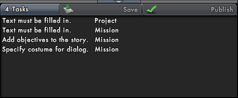
[[File: Foundry Tasks.png|right|thumb|238px|Error in the project that need to be fixed]] Under the sidebar there is a list of incomplete tasks. These are errors in your project that need to be fixed before it can be published. It is normal to have a number of errors in a new project, since it makes no sense to let a user publish an empty mission. Clicking on any task should redirect you to the element causing the problem.{{clear}}
+
+
==== Editors ====
+
[[File: Foundry Story Editor.png|right|thumb|238px|An editor for objectives]] Depending on your selection in the sidebar one of several editors will be opened in the center area of the Foundry. These may be objective editors, maps or costumes. Usually you will be able to manipulate the content of editors with mouse and keyboard input. Editing might also require to use the library and properties areas of the Foundry. {{clear}}
+
+
==== Libraries ====
+
[[File: Foundry Space Map Library.png|right|thumb|238px|A typical library]] {{Notebox|Searching in libraries works like searching the [[Exchange]], i.e. the complete string including spaces is matched against the names of the database items. So the order of your search terms matters.}} Most editors are accompanied by a library on the right. Libraries contain assets, with which you can populate editors. E.g. a pop-up dialog for a story editor or a NPC contact for a ground map. Most libraries will let you browse through several categories, filter items by criteria and text from a text box. {{clear}}
+
+
==== Properties ====
+
[[File:Foundry Properties.png||right|thumb|238px|The properties of an asteroid]] The map editor features a properties area at the bottom of the screen. With it you may edit many aspects of a selected object, like exact position by coordinates, NPC animations etc. We will discuss specific settings in detail when they become important. {{clear}}
+
+
==== Main menu ====
+
{{Notebox|Cut, Copy and Paste are not functioning at the moment.}}The menu entries are pretty redundant and can be found elsewhere in the Foundry interface, except for "Exit Editor":
+
+
* File
+
** New >
+
*** Create Map... (
+
*** Create Costume...
+
** Play Mission F5
+
** Save Project Ctrl+S
+
** Publish Project
+
** Exit Editor Alt+F4
+
* Edit
+
** Undo Crtl+Z
+
** Redo Ctrl+Y
+
** Cut
+
** Copy
+
** Paste
+
** Delete DELETE
+
+
== Your first mission ==
+
For the rest of this guide we will look at some of the details of making a mission. Since it's pointless to discuss the UI of the Foundry without a framework of reference, I will embed a tutorial to create a simple mission like those you may encounter in different patrols. So when I discuss several aspects of the Foundry, I will discuss, how certain aspects of this sample mission can be realized.
+
+
=== Plan ahead ===
+
It is important you have a clear idea planned out of what you want to do. The Foundry is a forceful tool. If you stumble through the mission making process without a goal, the Foundry will drown you in detail work and you will come up with patchwork. There will be enough room for creativity after the skeleton of the mission is completed.
+
+
Here is our plan for the tutorial: A ESD contact will send us to deliver some cargo to Kei, where we run into some Orions. Before we can deliver our cargo we will help the miners to defend their colony. The objectives should look as follows:
+
{{Notebox|It's helpful to sketch your mission by laying out missions objectives the way they display in-game.}}
+
* Go to [[Earth Space Dock]]
+
** Talk to Contact
+
** Interact with Console on ESD to Take up Cargo
+
* Go to the [[Kei System]]
+
** Fight [[Orion]] Raiders
+
** Repair Damaged Satellite
+
* Beam Down to Colony in Distress
+
** Fight Orions
+
** Disable Spatial Charges
+
** Deliver Cargo
+
{{Notebox|On social maps you may not place any additional NPCs, reach markers, objects etc., but are restricted to use objects that are flagged by the developers for UGC use.}} So our mission will require us to create maps for the Kei System (space) and Colony (ground, interior). ESD is a social map, so we will simply reuse it. We also need costumes for the ESD contact, Orion captain and Kei colony miner contact. We will create the miner from scratch and reuse premade costumes for the ESD and Orion contacts.
+
+
== Project ==
+
[[File:Foundry Pristine Project.jpg|thumb|right|238px|The Foundry]] In this mode you can review and edit the most general aspects of your mission and how it is presented to the public. You may rename the project, provide a shot description, leave notes for your own reference and read reviews by other users. There is aslo a toggle to determine which factions may access the mission (Starfleet or Klingon).{{clear}}
+
+
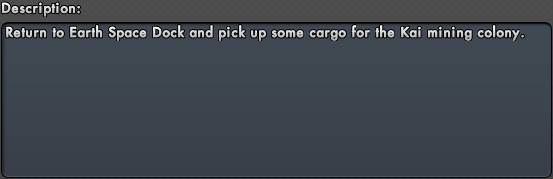
:[[File:Foundry Description.png|thumb|right|238px|Enter a short description]]'''Tutorial:''' Click "Project" in the sidebar if you have not done so already. Enter a short text in "Description" that should evoke the interest of other players who found it while doing a search. This text is the only thing visible to them before they accept the mission. So be concise and interesting. Outline the mission in two or three sentences, but don't spoil the player. {{clear}}
+
+
== Story ==
+
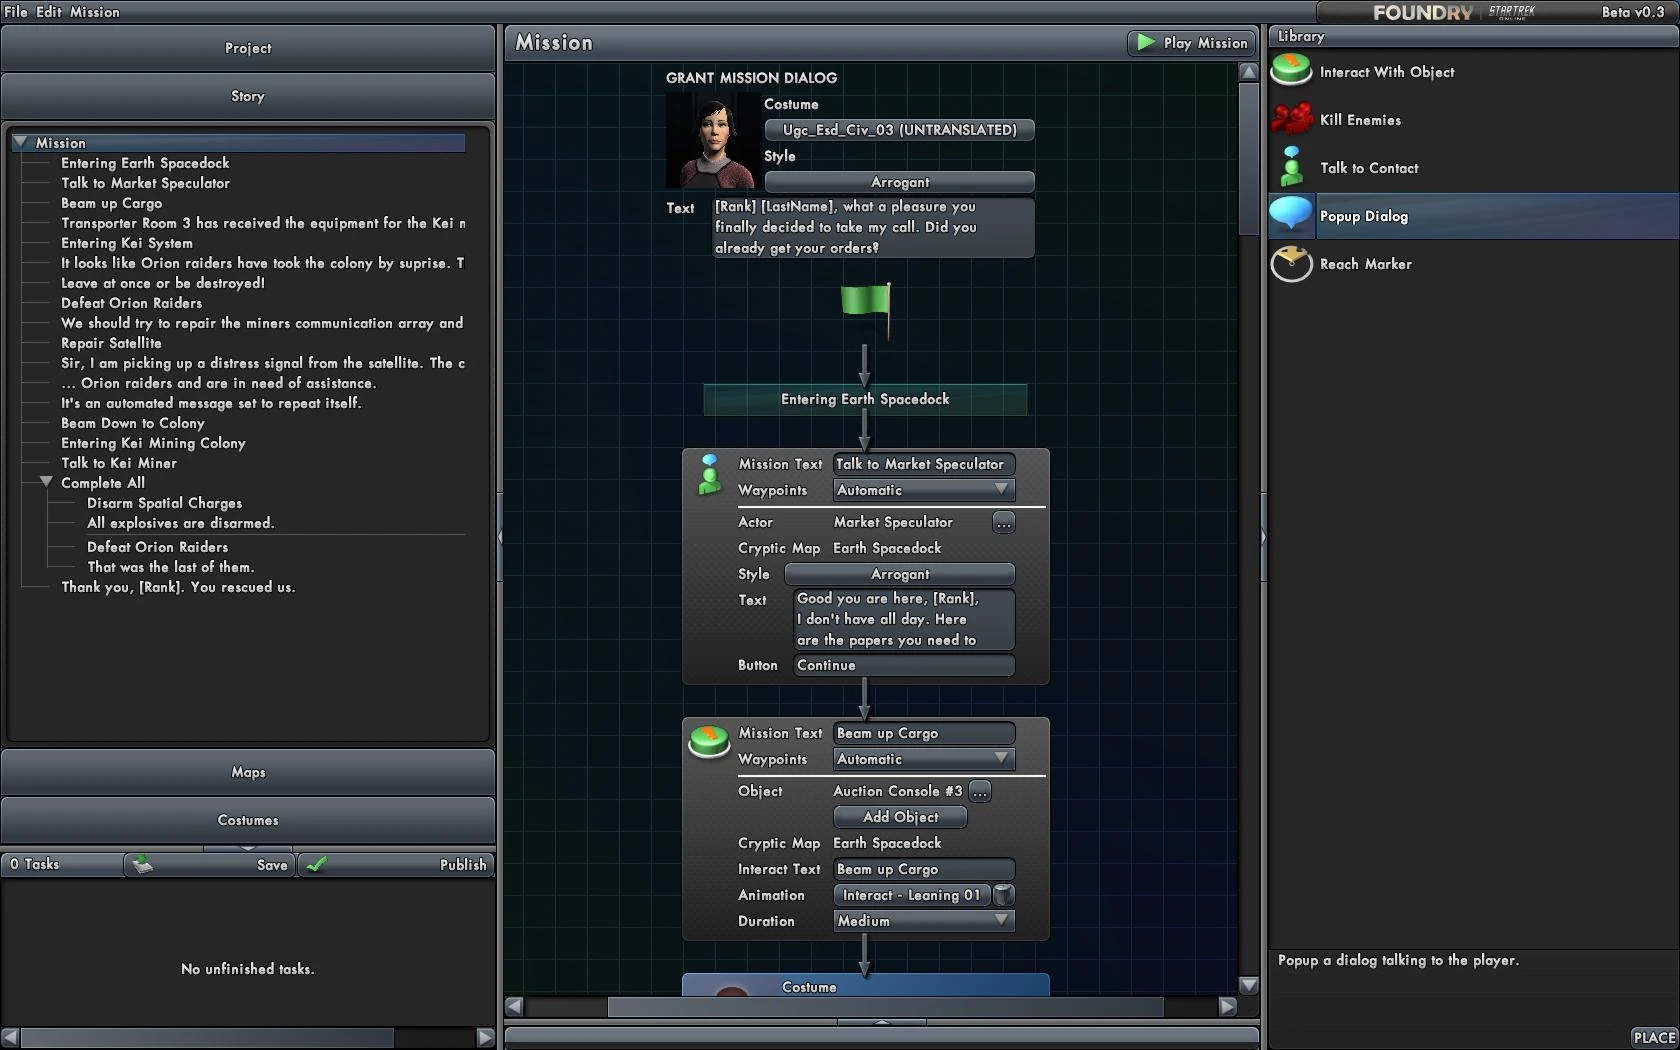
[[File:Foundry Story.jpg|right|thumb|238px|Editing the story of a mission]] By clicking the "Story" tab in the sidebar, the story editor opens. Here you design the "logic" of your mission and lay out the sequence of objectives the player has to complete in order to finish the mission.
+
+
In the sidebar you find a list of all story elements that are currently present in the mission. You will always see the full mission structure even if your mission takes place on more than one map.
+
+
In the main editor you see a graphical layout (similar to a [[wikipedia:Flow chart|flow chart]]). Each mission objective or popup dialog is represented by a box that connects to the next. The first and top-most objective is always the "grant mission dialog", after which the player is given the option to accept or decline the mission.
+
+
On the right you find a library of story elements. The following elements are currently available:
+
* Interact With Object: Interact with # things (objective)
+
* Kill Enemies: Defeat # mobs (objective)
+
* Talk to Contact: Interact with NPC (objective)
+
* Popup Dialog: Unprompted dialog with only one answer
+
* Reach Marker: Go to waypoint (objective)
+
+
All objectives/dialoges have to be completed in the sequence indicated by the arrows in the story editor. To place a new objective/dialog drag it from the library and place it in the main editor area.
+
+
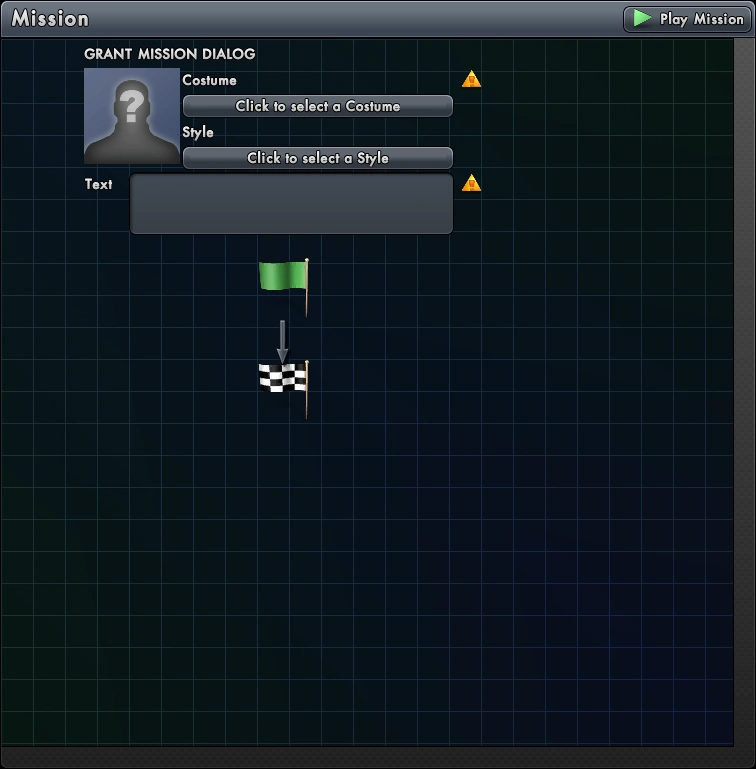
:'''Tutorial:''' place the following text into the "Text" of the "grant mission dialog":
+
+
<pre>[Rank] [LastName], what a pleasure you finally decided to take my call. Did you already get your orders?
+
+
Good. Prices are fluctuating a lot these days. As the Ferengi say: War is good for business. But I'm happy to report, I have obtained the mining equipment for Kei your superiors were looking for.
+
+
Please visit me at Earth Space Dock as soon as possible, I have a busy schedule.
+
+
Go to the Exchange at Earth Space Dock and talk to the Market Speculator.</pre>
+
{{notebox|Your dialog should contain these short concise instructions so the objectives are always clearly spelled out for the player.}}
+
:Use the mouse to select the last sentence and click "Highlight". This way the last sentence will appear in green and bold.{{clear}}
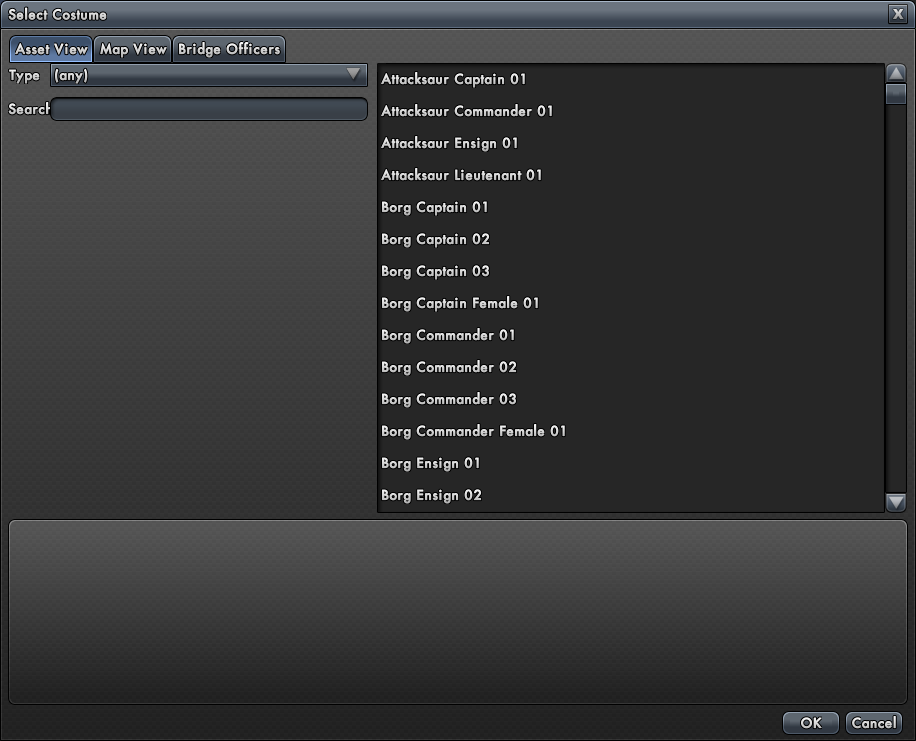
:Now select a costume for the portrait to be displayed with the text. Click the button under "Costume". Since we use a contact from a social zone, we can pick it directly from a map. Click "Map View" and select "Earth Spacedock". You can either pick the Market Speculator from the North-West of the map or select her from the list on the right. Click "OK". The portrait of the Market Speculator is now visible in the "grant mission dialog widget".{{clear}}
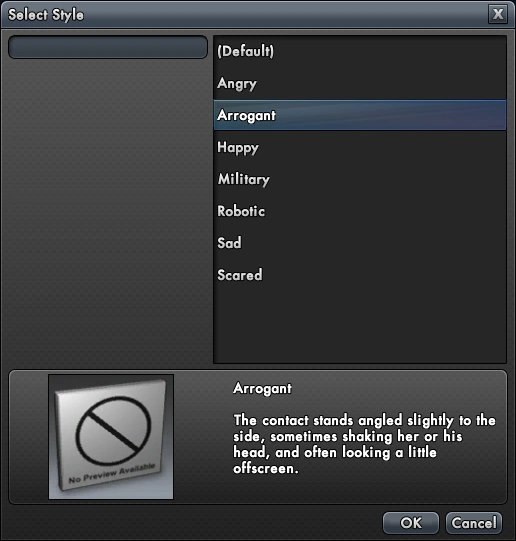
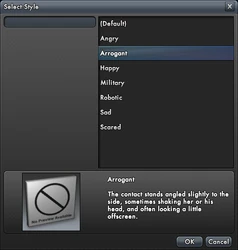
: We want to to make her a tense and busy character, so click the button under "Style" and select "Arrogant" from the dialog. Click "OK" and notice how the portrait is updated. You can use styles to make the dialog portraits more lifelike and enhance immersion.{{clear}}
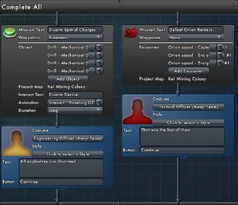
It is possible to have several simultaneous objectives, if all these objectives have to be completed in order for the mission to progress. This is the mechanic known from "system patrol" missions, where the player may decide in which order to visit the systems.
+
In order to create a parallel objective drag a new objective from the library directly on top of an already existing objective. The story editor automatically wraps both objectives in a "Complete All" box indicating that all objectives (or objective chains) in the box have to be resolved before the first objective below the box becomes active.
{{Notebox|It is important to wait for the launcher to perform any updates for Holodeck first, since there is a bug preventing you to immediately fire up Tribble.}} [[File: Game Launcher.png|thumb|238px|right|The game launcher]] Then start the [[game launcher]] and let perform any updates. When the big bottom left button reads "Engage", click "Tribble - Test Shard". Wait for the launcher to perform any patches. Click "Engage".
+
These
−
In the [[Character]] selection screen click the new tab
+
=== Writing dialog ===
== See also ==
== See also ==
Revision as of 18:57, 12 December 2010
WORK IN PROGRESS
The following is a WORK IN PROGRESS and should not yet be linked to any other articles, nor categorized anywhere.
To gain access to the Foundry, you need to sign up for the Tribble test server.
The game launcher
It is important to wait for the launcher to perform any updates for Holodeck first, since there is a bug preventing you to immediately fire up Tribble.
Then start the game launcher and let perform any updates. When the big bottom left button reads "Engage", click "Tribble - Test Shard". Wait for the launcher to perform any patches. Click "Engage".
Create Content tab
In the Character selection screen click the new tab "Create Content". You will need to create at least one dedicated character to use the Foundry. For this purpose, you are granted an additional character slot. Note that you need a Federation character to test Starfleet missions and a Klingon character to test KDF missions.
Create a character for testing
You are not given a lot of options to customize the test character. You may find that disturbing at first, but rest assured, you will only need the character as sort of dummy that is able to move, trigger dialogs and interact with objects. It is not a regular character that you will level up or should care about. In fact you are about to delete him or her quite often to switch between Federation and Klingon content. Simply hit "Create Content" to fire up the Foundry.
Manage projects
Foundry project management screen
When you select a character from the "Create Content" screen (or created a new one), you will be redirected to the project management screen of the foundry. Each mission you design is called "project" in the terminology of the Foundry. Projects are bound to your Account, not the testing character. So you will never lose any UGC mission when you delete one or all testing characters.
On the left hand side under "Owned Projects" you will see an alphabetic listing of all your projects by name. On top of this listing you have the options to Start a new project, delete a selected project and sort the list by other criteria. When you have already created projects, you may select any of them from the list to see a project summary, including user ratings for that mission.
Importing is a future feature and has not yet been implemented.
At the bottom of the column you can switch to a second project listing. This listing contains shared projects that you may import to work collaboratively with other users.
Create a New Project
In order to write a mission you need to start a new project. Click "New Project" in the top left. The EULA for The Foundry will appear and you have to accept the terms of use to continue. The following is a short, incomplete overview of what you may do or not do:
The EULA
* Use character names from any show and the first ten movies
But not their likeliness (i.e. it ok to talk about "Data", but not to create an NPC that looks like Brent Spiner)
Don't be to critical or controversial with your story telling. Check the paragraphs about political, religious and other topics.
Do not display the use of any drugs (even legal administration by doctors)
Do not display people with disabilities (VISOR etc.)
Do not include any URLs (e.g. link to your blog or fleet forum)
Important Disclaimer: Read and understand the EULA for yourself and do not rely on information from STOWiki.org to decide what you do and don't do in your mission. The EULA is subject to change and STOWiki.org can not take any liability for the accuracy of the above!
Click "Yes" to continue.
Name your project
The Foundry asks you to enter a name for your project. This is the name by which players will know your mission, i.e. the name of the mission in the mission journal, search pages and so on. The name may be changed later on, but changing the name may cause player's to lose track of the mission, since it cannot longer be found by the original name.
Click "OK" to create and load the project.
Editing a project
Loading a project
After selecting an existing project from the project management screen and clicking "Edit Project", or the successful creation of a new project as described above, the Foundry will load this project for you to edit. This might take a while.
The Foundry
When loading is complete, you will be send to the main Foundry editor interface. Let's take a quick tour.
Sidebar
The sidebar lets you browse your project
Like many IDEs, The Foundry has a sidebar in which you can navigate through your project. There are four sections between you may toggle.
Project: Used to review comments and publish updates of the mission to the game
Story: Used to create mission objectives and dialog and link maps to . Also lets you test play the mission from start to finish
Maps: Used to create and edit maps. Here you place NPCs, enemy mobs, objects to interact with and waypoints. Also you can test play individual maps.
Costumes: Used to create and customize the appearance of NPCs and ships.
We will discuss the individual sections in detail.
Tasks
Error in the project that need to be fixed
Under the sidebar there is a list of incomplete tasks. These are errors in your project that need to be fixed before it can be published. It is normal to have a number of errors in a new project, since it makes no sense to let a user publish an empty mission. Clicking on any task should redirect you to the element causing the problem.
Editors
An editor for objectives
Depending on your selection in the sidebar one of several editors will be opened in the center area of the Foundry. These may be objective editors, maps or costumes. Usually you will be able to manipulate the content of editors with mouse and keyboard input. Editing might also require to use the library and properties areas of the Foundry.
Libraries
A typical library
Searching in libraries works like searching the Exchange, i.e. the complete string including spaces is matched against the names of the database items. So the order of your search terms matters.
Most editors are accompanied by a library on the right. Libraries contain assets, with which you can populate editors. E.g. a pop-up dialog for a story editor or a NPC contact for a ground map. Most libraries will let you browse through several categories, filter items by criteria and text from a text box.
Properties
The properties of an asteroid
The map editor features a properties area at the bottom of the screen. With it you may edit many aspects of a selected object, like exact position by coordinates, NPC animations etc. We will discuss specific settings in detail when they become important.
Main menu
Cut, Copy and Paste are not functioning at the moment.
The menu entries are pretty redundant and can be found elsewhere in the Foundry interface, except for "Exit Editor":
File
New >
Create Map... (
Create Costume...
Play Mission F5
Save Project Ctrl+S
Publish Project
Exit Editor Alt+F4
Edit
Undo Crtl+Z
Redo Ctrl+Y
Cut
Copy
Paste
Delete DELETE
Your first mission
For the rest of this guide we will look at some of the details of making a mission. Since it's pointless to discuss the UI of the Foundry without a framework of reference, I will embed a tutorial to create a simple mission like those you may encounter in different patrols. So when I discuss several aspects of the Foundry, I will discuss, how certain aspects of this sample mission can be realized.
Plan ahead
It is important you have a clear idea planned out of what you want to do. The Foundry is a forceful tool. If you stumble through the mission making process without a goal, the Foundry will drown you in detail work and you will come up with patchwork. There will be enough room for creativity after the skeleton of the mission is completed.
Here is our plan for the tutorial: A ESD contact will send us to deliver some cargo to Kei, where we run into some Orions. Before we can deliver our cargo we will help the miners to defend their colony. The objectives should look as follows:
It's helpful to sketch your mission by laying out missions objectives the way they display in-game.
On social maps you may not place any additional NPCs, reach markers, objects etc., but are restricted to use objects that are flagged by the developers for UGC use.
So our mission will require us to create maps for the Kei System (space) and Colony (ground, interior). ESD is a social map, so we will simply reuse it. We also need costumes for the ESD contact, Orion captain and Kei colony miner contact. We will create the miner from scratch and reuse premade costumes for the ESD and Orion contacts.
Project
The Foundry
In this mode you can review and edit the most general aspects of your mission and how it is presented to the public. You may rename the project, provide a shot description, leave notes for your own reference and read reviews by other users. There is aslo a toggle to determine which factions may access the mission (Starfleet or Klingon).
Enter a short description
Tutorial: Click "Project" in the sidebar if you have not done so already. Enter a short text in "Description" that should evoke the interest of other players who found it while doing a search. This text is the only thing visible to them before they accept the mission. So be concise and interesting. Outline the mission in two or three sentences, but don't spoil the player.
Story
Editing the story of a mission
By clicking the "Story" tab in the sidebar, the story editor opens. Here you design the "logic" of your mission and lay out the sequence of objectives the player has to complete in order to finish the mission.
In the sidebar you find a list of all story elements that are currently present in the mission. You will always see the full mission structure even if your mission takes place on more than one map.
In the main editor you see a graphical layout (similar to a flow chart). Each mission objective or popup dialog is represented by a box that connects to the next. The first and top-most objective is always the "grant mission dialog", after which the player is given the option to accept or decline the mission.
On the right you find a library of story elements. The following elements are currently available:
Interact With Object: Interact with # things (objective)
Kill Enemies: Defeat # mobs (objective)
Talk to Contact: Interact with NPC (objective)
Popup Dialog: Unprompted dialog with only one answer
Reach Marker: Go to waypoint (objective)
All objectives/dialoges have to be completed in the sequence indicated by the arrows in the story editor. To place a new objective/dialog drag it from the library and place it in the main editor area.
Tutorial: place the following text into the "Text" of the "grant mission dialog":
[Rank] [LastName], what a pleasure you finally decided to take my call. Did you already get your orders?

Good. Prices are fluctuating a lot these days. As the Ferengi say: War is good for business. But I'm happy to report, I have obtained the mining equipment for Kei your superiors were looking for.

Please visit me at Earth Space Dock as soon as possible, I have a busy schedule.

Go to the Exchange at Earth Space Dock and talk to the Market Speculator.
Your dialog should contain these short concise instructions so the objectives are always clearly spelled out for the player.
Use the mouse to select the last sentence and click "Highlight". This way the last sentence will appear in green and bold.
Select Costume dialog
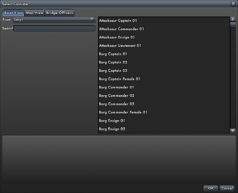
Now select a costume for the portrait to be displayed with the text. Click the button under "Costume". Since we use a contact from a social zone, we can pick it directly from a map. Click "Map View" and select "Earth Spacedock". You can either pick the Market Speculator from the North-West of the map or select her from the list on the right. Click "OK". The portrait of the Market Speculator is now visible in the "grant mission dialog widget".
Select Style dialog
We want to to make her a tense and busy character, so click the button under "Style" and select "Arrogant" from the dialog. Click "OK" and notice how the portrait is updated. You can use styles to make the dialog portraits more lifelike and enhance immersion.
Map transitions
Parallel objectives
Parallel mission objectives
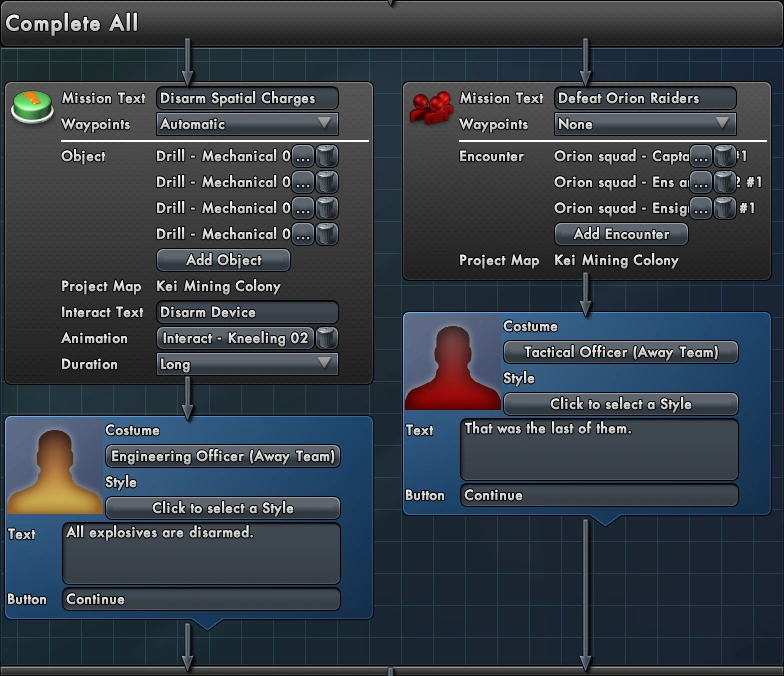
It is possible to have several simultaneous objectives, if all these objectives have to be completed in order for the mission to progress. This is the mechanic known from "system patrol" missions, where the player may decide in which order to visit the systems.
In order to create a parallel objective drag a new objective from the library directly on top of an already existing objective. The story editor automatically wraps both objectives in a "Complete All" box indicating that all objectives (or objective chains) in the box have to be resolved before the first objective below the box becomes active.


