
Добро пожаловать, кадет...
Добро пожаловать в руководства для начинающих, первое из многих руководств Star Trek Online (STO). Это руководство должно служить как стартовая площадка для всех кто является новичком в игре или тем, кто хочет знать больше об основах STO.
Фракции[ | ]
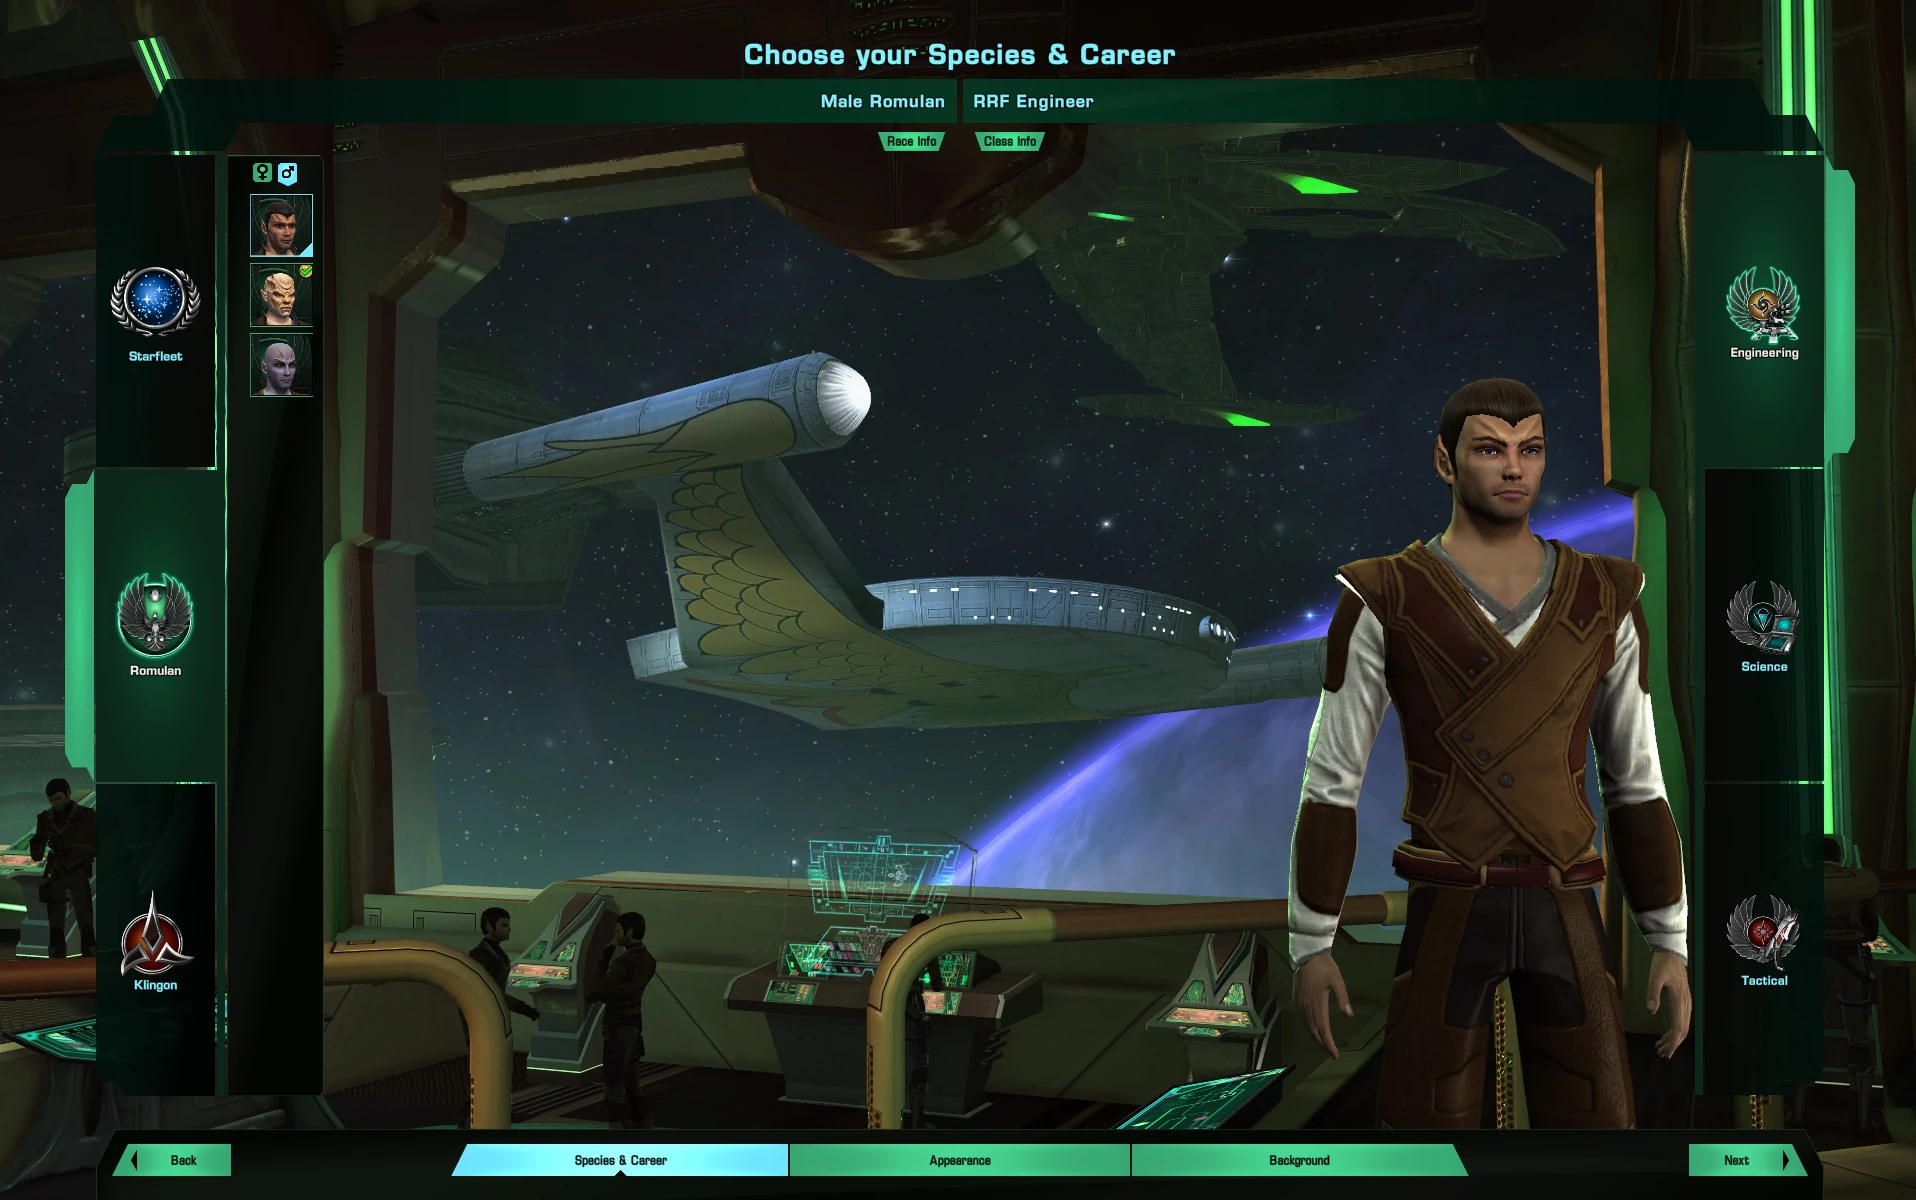
В окне создания персонажа Вы можете выбрать Фракцию, расу(слева), также как и путь развития(справа) .
Перед созданием персонажа, Вы должны выбрать фракцию. Вы можете играть за Федерацию, the Клингонскую Империю, Ромуланскую Империю[1] or the TOS Федерация. Каждая фракция представляет Вам свою собственную сюжетную линию, набор своих собственных рас и кораблей, а также Звездных баз. У Ромуланцев есть дополнительный выбор с кем работать в союзе, этот выбор впоследствии даст доступ к кораблям соответствующей фракции.
- ↑ (with Reman sub-faction purchasable from C Store or unlocked via reputation system)
Пути Развития[ | ]
В Star Trek Online, существует три пути развития, которые игроки могут выбрать. Они соответствуют трем главным отделам в Звуздном Флоте: Инженерный, Научный and Тактический. Пути развития в Star Trek Online очень похожи на классы в большинстве других MMORPGs, за исключением того, что они не настолько ограничены, насколько жестко определены. Игрок любого пути развития может летать на любом типе кораблей и надевать любую A player of any career path can fly any type of starship and equip any броню or оружие. Во время некоторых миссий Вам будут доступны опции, которые соответствуют вашему пути развития.
Сравнение[ | ]
Каждый класс имеет определенную направленность и играть одну или несколько ролей в группе, также как и корабль наиболее подходящий под этому классу.
- Тактические офицеры наиболее успешно могут наносить DPS (Damage Per Second - Урон в секунду), т.е. наносить максимальные повреждения; они делают свою работу лучше всего, нанося повреждения врагам в наземных и космических боях. Тактические офицеры обычно носят красную форму и лучшим способом используют Эскорты (Федерация) and Рейдеры или Рапотры (Империя Клингонов), которые являются лучшими кораблями для нанесения урона врагам. Они достигают этого посредством максимального увеличения исходящего урона их энергетического (Лучевое оружие & Пушки) и реактивного вооружения (Торпеды & Мины), и через увеличение этого потенциала с помощью Моделей Атаки (Attack Patterns (α, β, Δ, and Ω)).
In ground combat, tactical kits give powers that allow the player to put out increased damage as well as spike damage (one-time concentrated bursts of firepower), AoE (Area of Effect) damage via grenades, and abilities that improve the damage output and staying power of allies.
- Engineers are best suited to the Healer and Tank roles. Engineers wear the color gold for their uniforms and are ideally matched with Cruisers (Federation) and Battlecruisers (Klingon Empire), which are also best suited for tanking. Tanks take the brunt of damage in battle and try to attract all enemies to themselves, while the DPS or Damage players do the majority of the actual firing and damage. As healers, Engineers are adept at healing hull damage, although they also have strong shield healing. Their focus is primarily on survivability and resilience in space combat, while supporting their Away Team in both space and ground combat with fixed-position automated weaponry, shield and medical generators, technological buffs, and other repairs and improvements.
In ground combat, engineering kits generally involve fabricating turrets and shields, supporting your team with weapon buffs and seeker as well as support drones, and laying mine barriers and bombs.
- Science officers are most useful in the Healer and "Buffer/Debuffer" roles, where they provide healing and buffs for allies (and themselves), as well as powers that weaken and disable enemy NPCs. Science officers wear the color blue and are ideally matched with Science Vessels (Federation) and Warships (Klingon Empire), ship classes whose onus is to weaken and control their enemies, and provide some healing on the side.
In ground combat, science kits offer team healing and AoE (Area of Effect) damage, but can also grant abilities that control or debuff enemy resiliency, damage and movement.
Races[ | ]
- See also our guides on custom-built canon-aliens & canon-uniforms.
Each faction has its own collection of playable races, each coming with a specific, fixed racial trait. The important thing to remember is that there are no "Uber"-races. Go with what you feel comfortable with.
Traits[ | ]
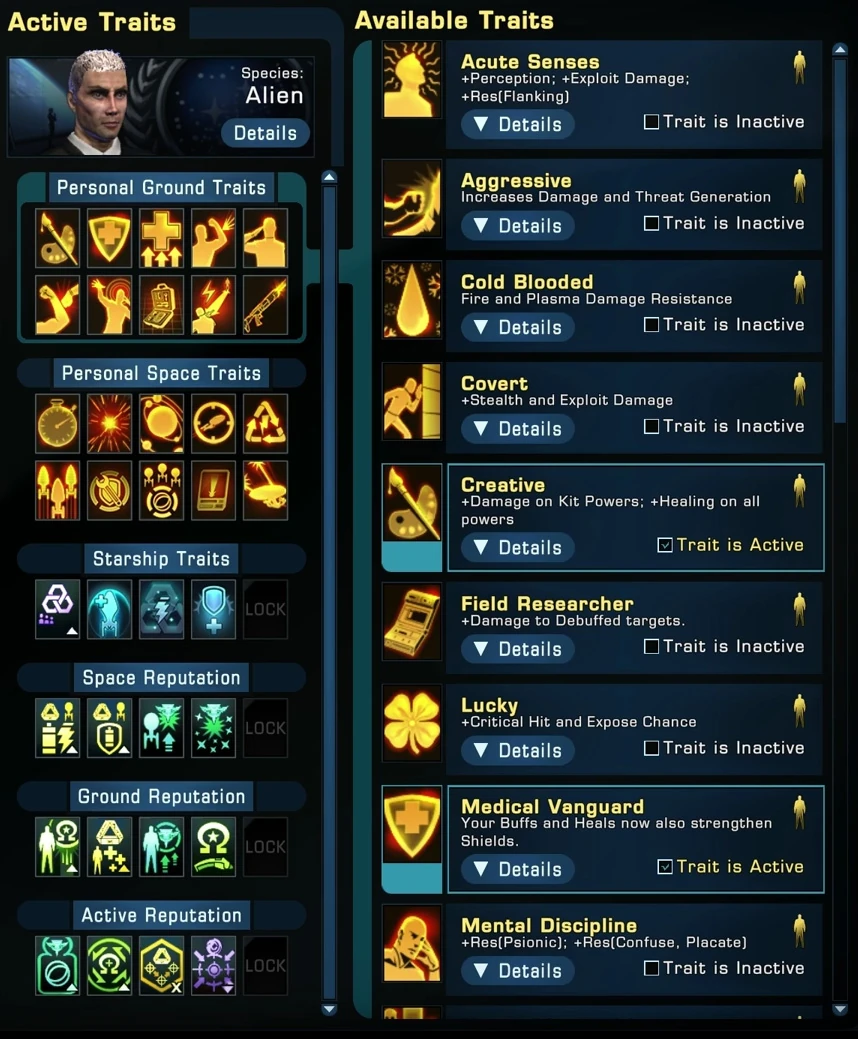
Your traits can be re-viewed and -selected in the traits menu at any time during the game.
Traits are mostly passive bonuses that can be activated by assigning them to slots. Picking your race (or choosing to create your own custom race) automatically means picking one specific non-customizable racial trait (or creating one for your custom alien). Also, three additional race-typical traits are assigned to each preset race, however, these can be customized once you are in-game (see image on the right). As you level your character up, two additional personal trait slots (1 space, 1 ground) become available every 10 levels, so each player has a total of 18 (9 ground, 9 space) customizable personal traits and one fixed racial trait at level 60 (the Reputation System grants further traits from level 50 onwards; more information on the trait-article).
Levels & Ranks[ | ]
Star Trek Online lets your character progress through different levels by accumulating Experience Points, just like many other MMORPGs. In STO, however, each bracket of 10 levels also comprises a rank (Ensign & Lieutenant counted as one rank). At each level, character gains level rewards and Skill points (explained below). Furthermore, new tiers of starships are opened up to each new rank.
| Levels | Starship Tier | Gear Mark | Rank |
Rank |
Rank |
Rank |
Rank |
Experience points |
|---|---|---|---|---|---|---|---|---|
| 0 | Tier 1 | Standard Issue | Cadet | Lieutenant Junior Grade | Warrior | Citizen | Fifth | 0 |
| 1 | Tier 1 Tier 6[2] Tier 4[3] |
Mark I-II | Lieutenant | Fourth | 6,500 | |||
| 10 | Tier 2 | Mark III-IV | Lieutenant Commander | Centurion | Third | 33,500 | ||
| 20 | Tier 3 | Mark V-VI | Commander | Subcommander | Second | 93,500 | ||
| 30 | Tier 4 | Mark VII-VIII | Captain | Commander | First | 173,500 | ||
| 40 | Tier 5 | Mark IX-X | Rear Admiral, Lower Half | Brigadier General | Subadmiral I | Master First | 263,500 | |
| 45 | Mark XI-XII | Rear Admiral, Upper Half | Major General | Subadmiral II | Senior First | 313,500 | ||
| 50 | Tier 5-U Tier 6 |
Mark XIII-XIV | Vice Admiral | Lieutenant General | Vice Admiral | Elite First | 366,000 | |
| 55 | Admiral | General | Admiral | Revered First | 428,500 | |||
| 60 | Mark XV | Fleet Admiral | Dahar Master | Fleet Admiral | Honored First | 491,000 | ||
| 65 | 578,500 | |||||||
| Spec.[4] | 155,872[4] | |||||||
- ↑ Jem'Hadar captains begin at level 60. NPCs and Bridge Officers use these rank names, and they appear in the rank progression reward list.
- ↑ Since Rise of Discovery, All Tier 6 ships have become Scaling ships and are now available to all players after finishing their faction's tutorial.
- ↑ The Prototype Walker Light Exploration Cruiser, Kobayashi Maru Freighter, and Tong'Duj Freighter are all Tier 4 level scaling starships
- ↑ Each subsequent specialization level after reaching level 65.
Note: Additionally and independently from your military rank you can gain commendation ranks as part of the Duty officer system.
Skills & Specializations[ | ]
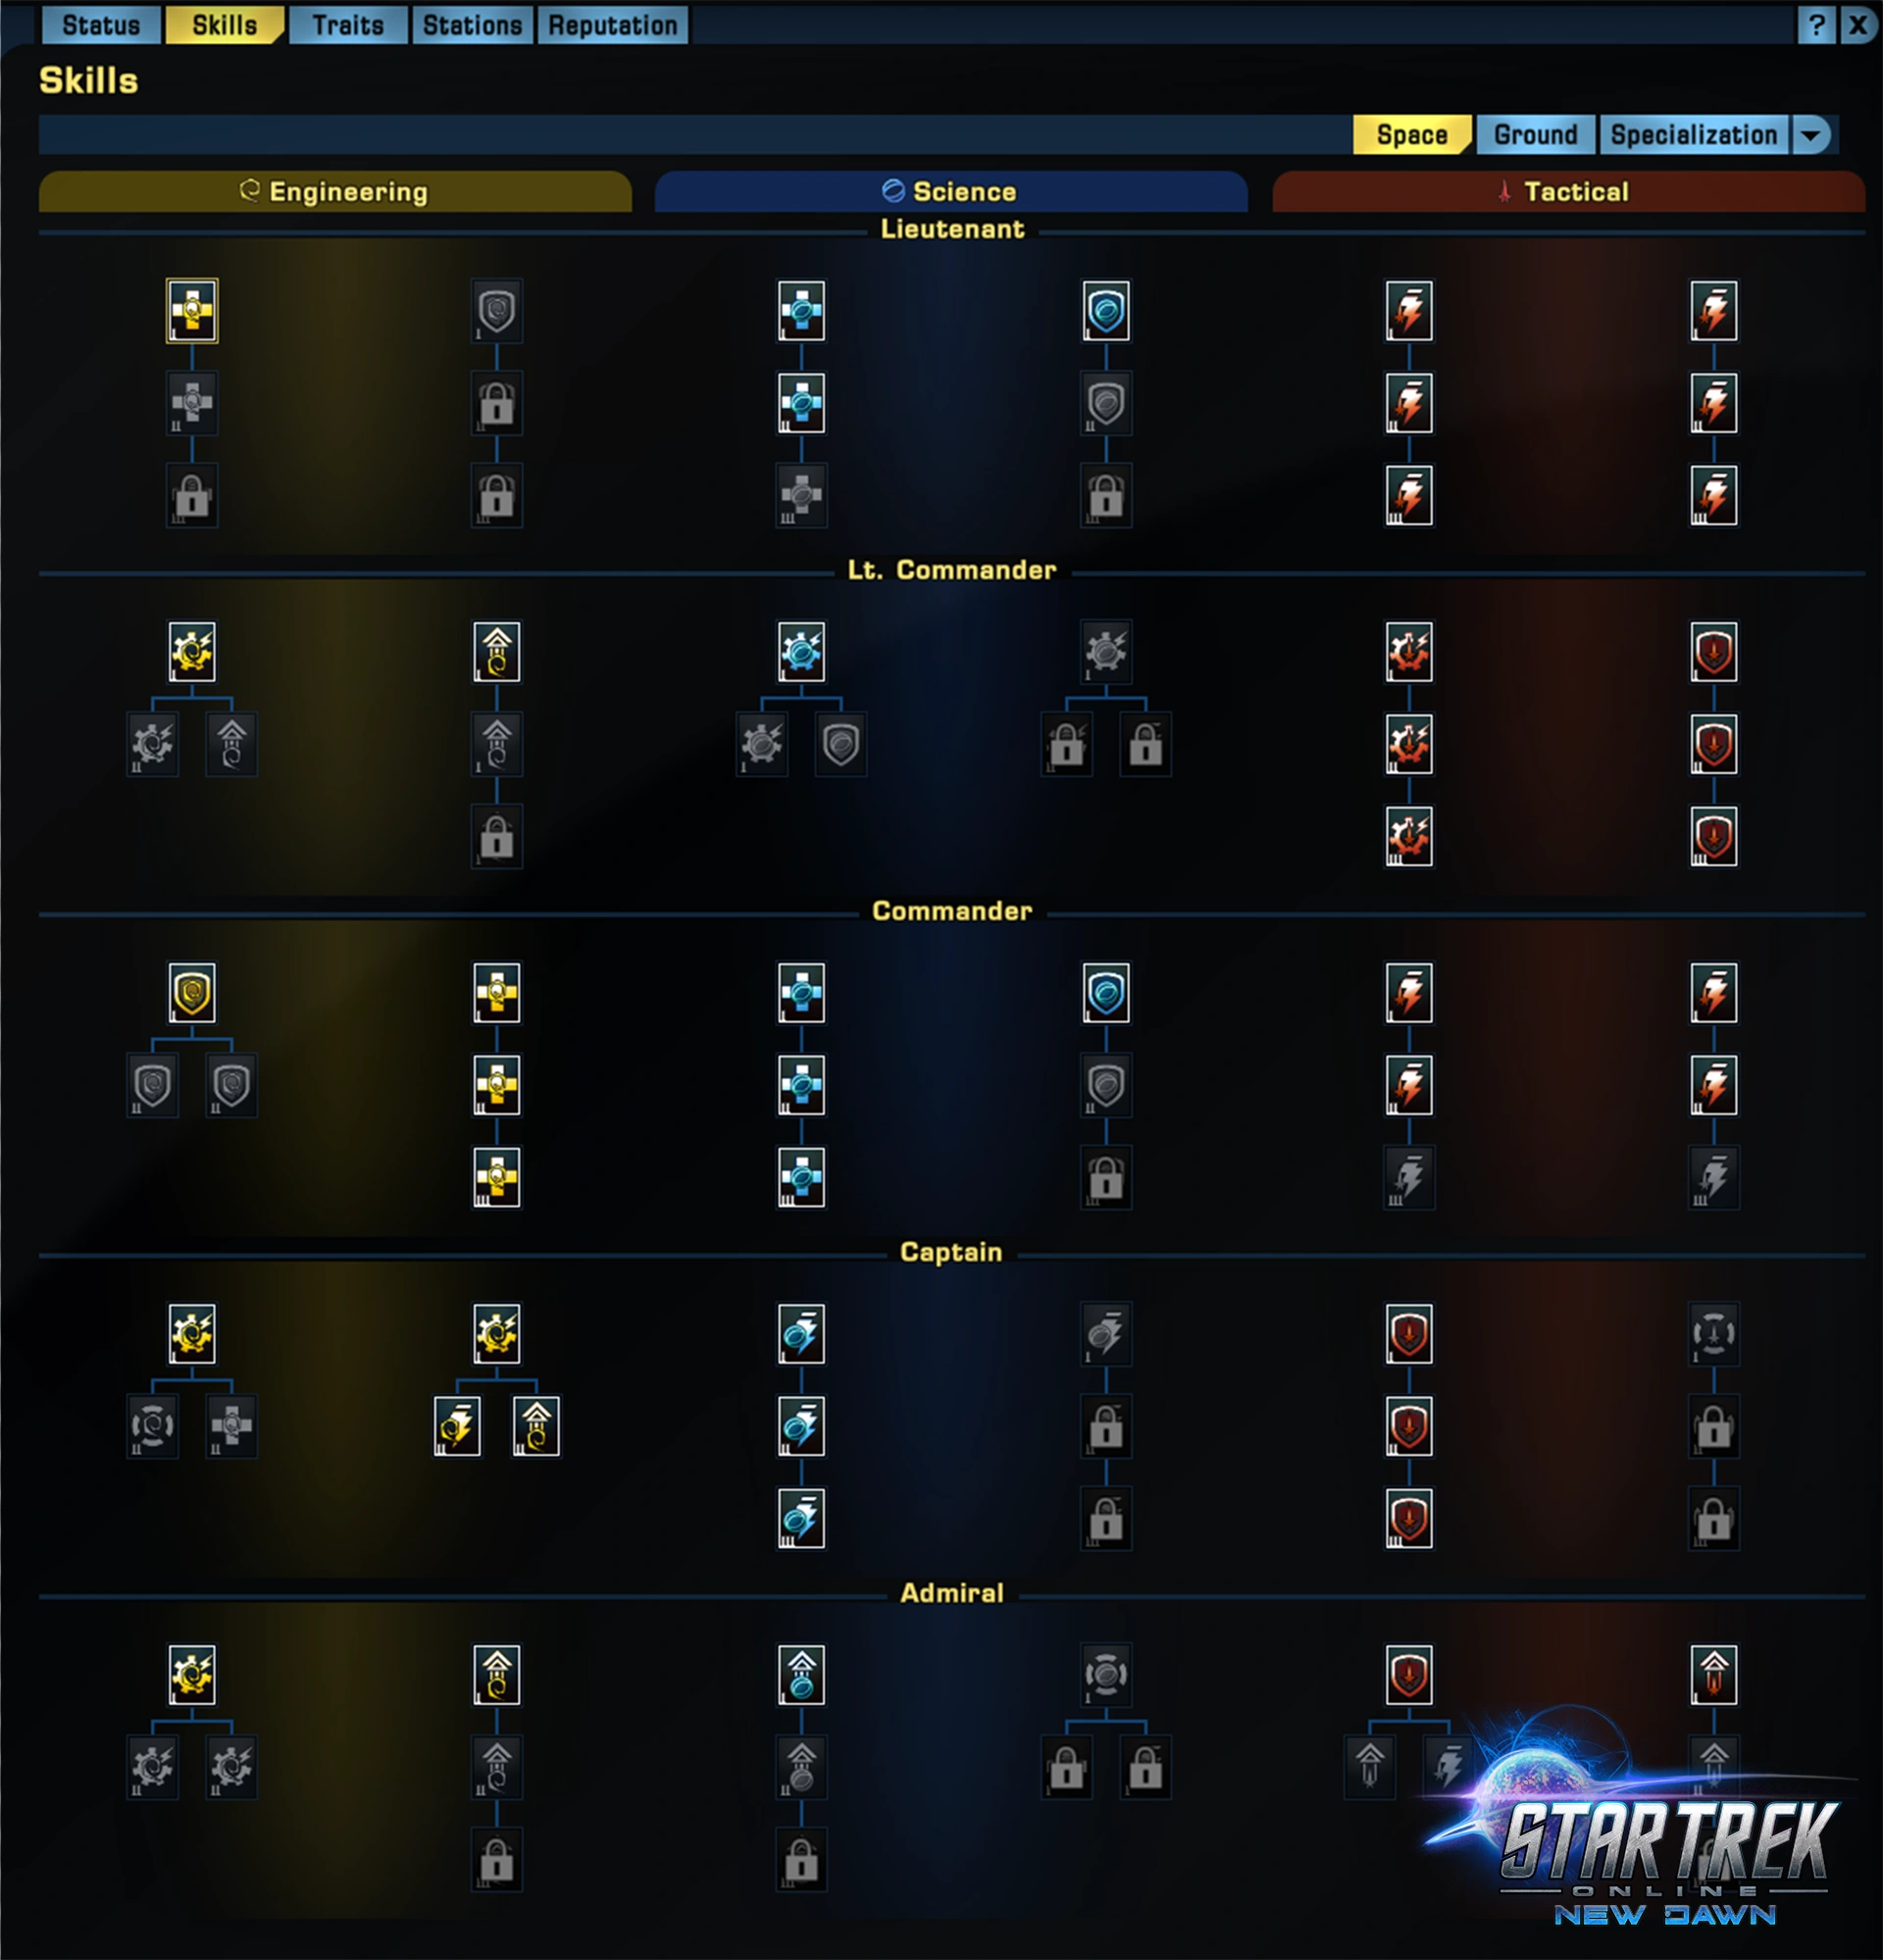
Skills in Star Trek Online are comparable to "talents" in other games and are distributed as your character gains skill points while leveling up.
Skills (comparable to "talents" in other games) are unlocked at level 5 and increase the effectiveness of abilities and/or improve certain base stats, e.g., critical hit chance or hit points.
Skills are seperated into two major groups: Space & Ground. Space skills are subgrouped into "Tactical", "Engineering ", and "Science"; ground skills into "Weapon", "Health and Armor", "Personal Shields", and "Kit". Every player, regardless of the career path, can access any skill.
Space skills have five levels (Lieutenant, Lt. Commander, Commander, Captain, and Admiral), which require 0, 5, 15, 25, and 35 spent "space points" to be accessed, respectively. In total, there are 90 space skills and a level 50 player will have 46 space points to spend (one every level from 5-50). Ground skills have no such hierarchical order. In total, there are 20 ground skills and a level 50 player will have 10 ground points to spend (one every 2 levels from 5-50).
At level 50, the skill system is maxed out and players begin to earn points that can be spent in the Captain Specialization system. This is a very similar, talent tree-like system, but it is not capped at a certain maximum number of spent points, but instead allows players to keep earning specialization points indefinitely.
Abilities[ | ]
Abilities are the actions that you and your bridge officers can take in combat. There are both space and ground abilities. You gain access to abilities in various ways:
- Players will learn a few new abilities as they rank up. The majority of ground abilities available to players, however, will be based on the kit modules you have equipped.
- Your starship's abilities are determined by your bridge officers - their space abilities and the rank of the station you assigned to them. A Commander-rank bridge officer at an Ensign station will only be able to use his/her Ensign ability, regardless of the officer's actual rank.
- Bridge officers can learn new abilities using the Training Manuals sold by the Bridge Officer Trainers.
Cooldowns[ | ]
In addition to their normal recharge time, abilities that are linked to the same subsystem (e.g. if they have "System: Batteries" in their descriptions) share an additional cooldown time during which no other abilities of the same subsystem may be used. For example, the Emergency Power to Weapons I ability triggers a 20-second cooldown on your ship's Batteries subsystem, during which time no other "System: Batteries" Ability (such as Emergency Power to Shields) may be used.
Bridge Officers[ | ]
- See main article: Bridge Officer
In Star Trek Online, your character can be assisted in ground combat by an away team of up to four computer-controlled Bridge Officers (comparable to "pets" of other games and with up to four ground-abilities per officer). In space combat, Bridge Officers (or "BOffs") bring with them most of the abilities you can use (up to four space abilities per officer).
Controls[ | ]
- See also: Guide: Keybinds
This is a very basic guide to the initial controls of the game, both in flight and ground modes, and also a couple of "tricks" to help you along the way.
Please Note The following key mappings are true for the Windows English keyboard layout. Other OSes or language layouts may vary.
The game has two basic playing modes:
Ground Mode[ | ]
- See also: Ground combat
This is where your character is in person on the screen either in friendly territory such as a starbase or in enemy territory such as a ship or planet.
Basic Controls[ | ]
| Key | Action |
|---|---|
| W | Run Forward |
| Shift + W | Sprint Forward |
| S | Run Backward |
| A | Turn Left |
| D | Turn Right |
| Q | Strafe Left |
| E | Strafe Right |
| R | Toggle continuous sprint on / off |
| F | Interact with an object near to you, such as a person, crate or turbolift |
Space Mode[ | ]
- See also: Space combat
This is where you are guiding your ship through either open space or within a star system
Basic Controls[ | ]
| Key | Action |
|---|---|
| Q | Decrease flight speed |
| E | Increase flight speed |
| R | Toggle full speed |
| Shift+ R | Toggle Full Impulse |
| A | Bank Left |
| D | Bank Right |
| W | Nose down |
| S | Nose Up |
| F | Interact with an object near to you, such as an anomaly, or accept a prompt |
Player abilities[ | ]
- See also: Player abilities
On the screen in either mode are controls for actions that your character can perform. In ground mode you will be shown your weapon's main action (normal "fire") and other possible actions such as "Exploit attacks". These each have a number to the top left of their control, and can be activated by pressing the corresponding key on your keyboard (1 through 0)
You can have up to four rows of controls on screen at any one time in both ground and space modes, to set these click the icon to the top right of the control module that looks like three stacked playing cards. This brings up a control that allows you to select between one and four rows of controls.
On the left hand end of these rows is a number between 1 and 10 with up and down arrows. These allow you to set up your own configurations and scroll between available controls.
What do A, C and Sh mean?[ | ]
These are the methods of using that control on the keyboard
A = ALT, C = CTRL, Sh = Shift.
Bridge Officer abilities[ | ]
- See also: Bridge Officer abilities
Each Bridge officer has training in different capabilities allowing them to vastly change the basic setup of your ship, be it by adding extra power to your next phaser shot or healing your shields mid-combat.
The initial play setup gives you a row of icons below your main ability section, showing the face and abilities of each of your bridge officers. When you start the game each officer will only have one ability, but as you progress through the game the number and class of abilities increase (you can also train your officers either through your own abilities, additional bridge officers or at certain starbases).
These action icons will generally have "A" and a number in their action boxes. To control with the keyboard hold the ALT key and press the appropriate number.
Remember, when purchasing a new ship, set the bridge officers! Also you might try to remember to keep them as trained and as promoted as possible to increase their additional abilities.
Moving Controls[ | ]
The game has a funny habit of moving your controls around, especially when you gain new abilities, even as far as new weapons!
To stop your firing actions, heals, buffs and debuffs being all over the place you can move the controls around as you wish them to be. Just do this when not in a combat area to avoid some blushes and much muttering of "Where did my phasers go!?"
To move a control, drag it with the right mouse button from where it currently resides to your required location. This can be within or across action bar rows (see above). After you have your actions set up the way you want them, you can click a checkbox that locks your action bars to prevent your abilities from being moved around or from accidental removal altogether.
Advanced control setup[ | ]
All of the key mappings and controls can be adjusted and moved around the screen using the controls in the option menu. To manually adjust the placement of monitor panels and controls, click the game options icon to the right of the minimap and select the top HUD option, then drag the corresponding green boxes to your convenience.
Luckily, they also have a reset function!